Showing posts with label up-cycle. Show all posts

Wednesday, March 13, 2019

Another Stash Busting Project

Okay, first of all let me clarify......it was someone else's stash...and I had help (thank you Susan). A few years back, a good friend showed me some wool fabric she was planning to rid herself of. She had been a rug hooker for many years but had pretty much given up that hobby for several others, so of course, I could not resist these beautiful hand dyed wools and said that perhaps I could do something with it. Well...guess what...it came to my house only to sit on a shelf until I finally decided I had to use it or move it on.
The challenge was that because it was a rug hookers stash, it was not "yardage", it was pieces/strips. But it was beautiful quality in a gloriously rich, wide, range of colours. I decided to make a wool throw.....something just right for draping over oneself while knitting, watching TV, reading or maybe even a little lazy afternoon snooze.

This is where Susan came in, I had way too much and needed help using this stuff up. We split the stash...I took predominantly blues and greens...Susan, reds and oranges. We also used some thrift shop finds to supplement....a kilt, a man's suit and a few other pieces were disassembled and in some cases dyed to give us exactly the extras we needed. (for some reason I don't have any of the greens pictured here)  the pile on the right was the result of some dye experiments.


I created a conceptual diagram of the sort of thing we were trying to achieve and we were off.


The next step was to make sure everything was cleanly trimmed (the trimmed bits looked too pretty to toss away.)


and to sort the pieces by size....some were as much as 11" long, others closer to 4". then we just played laying them out to make workable rows.


We decided that we would sew them together in an unconventional way.....so that we would not be dealing with tons of seams, my reasoning for this was that I knew I wanted to do big stitch quilting at the end. I think Susan was more clever and took hers to a long-armer  ( I will explain shortly)


Once we each had a pleasing layout, the pieces were simply machine stitched by butting the raw edges up to each other and using a triple zig zag which was such a pleasant sewing process.  Long vertical rows were created, then each row was attached to the next in the same manner


While I stayed very much in a subdued colour scheme, Susan on the other hand, added some brilliant, unexpected pops of colour to hers.


Susan and I each used a thin batting and found some nice Robert Kaufman flannel for our backings


A piece of soap served to mark the concentric circles which I would hand stitch using 12wt Aurifil cotton. The flannel for the back was only 45" wide....it needed to be pieced to get the required width, Susan pieced hers entirely with the flannel


...I chose to add a row of the same wool pieces used on the front to create my pieced back


These throws finished at 60" x 50" and are super cosy


the texture added by the machine quilting is fabulous!


I used striped cotton leftovers from the backing of a previous quilt for my binding.....Susan pieced wool to create her binding


I LOVE that Susan kept the labels in place from one of the up-cycled clothing pieces


Now.......time ( and use ) will tell if not having sewn traditional seams will have been a poor decision.....I must admit that I am a little concerned about how much stress the joins will endure over time. I think Susan was wise to have her quilt machine quilted as I think that will help its sturdiness and durability.

But, I have been using mine every evening for several weeks and it is not showing signs of any problems yet....."yet" being a key word.  I may go back and add more stitching to mine just the same.

oh....and btw......we were not completely successful at "stashbusting"  LOL! 


Thursday, December 6, 2018

Dryer Balls

I have been hearing about the use of dryer balls more and more lately and decided to try making a few to see how well they actually work.
If for some unknown reason you have not heard of these, they are suppose to replace the use of dryer sheets, reduce static cling, provide more airflow around your garments in the dryer which should result in less drying time.  Clearly lots of benefits
Of course, a quick Google or You Tube search will yield many tutorials on how to make them. I tried a couple of things, this is what worked best for me.

I started gathering up my supplies, I had a large 100% wool thrift store sweater that was destined to be ripped apart (that would be my core) note...it MUST be wool....it needs to "felt" so acrylic will not work. I pulled together random bits of wool fibre (batt and rovings) that would become the outer crust. In addition, I dug out my rarely used needle felting tool, a pair of pantyhose and I was ready to go. (the needle felting tool is not essential, but since I already had one, it did make the process very easy

First, I began deconstructing the sweater and created tightly wound, firm, tennis sized balls.


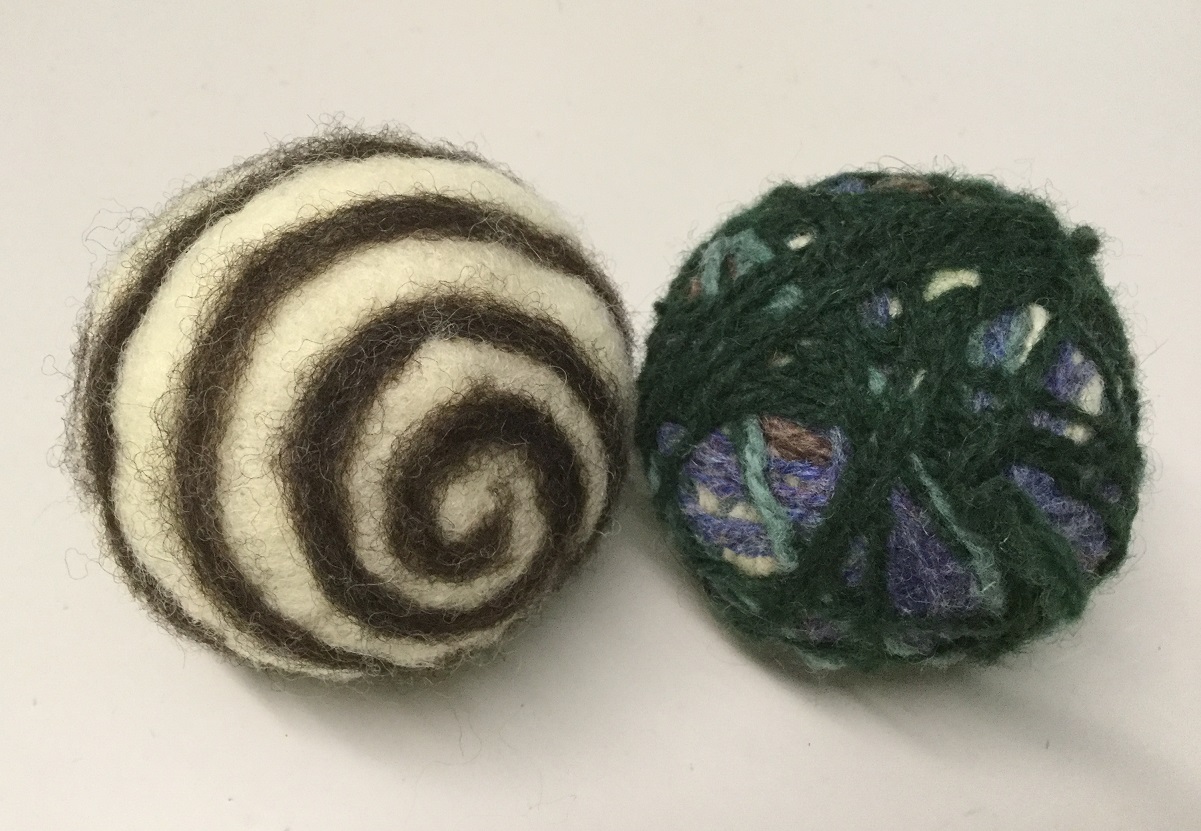
next I began layering fiber over the wound yarn and used my needle felting tool to help secure it in place, I encased the wound balls with several layers.....then I started to play.


Because...who wants plain old boring balls? I used some contrasting fibre to add interesting pattern


once I was satisfied with the size and density of each ball they were placed into one leg of some pantyhose.....it was stretched and tightly tied between each of them as they were added, if you look close you can see the knots.


then it was  a trip to the washer with HOT water and soap. They all felted well and were able to then head for a spin in the dryer to finish the process after which they were released from the pantyhose, ready for regular use.


I have done several loads of laundry since making these and am finding that they do in fact work very well.     If you are wondering, I have been using 3 - 4 at a time per load


Monday, November 14, 2016

Up-cycling a Vintage Suitcase

Found this sturdy little suitcase in need of some work.  The plan is for it to become a sort of "go bag" for supplies. This should be able to accommodate everything I could need when sewing away from home.


It did not start out looking like this. First it really needed a serious cleaning.  The outer shell was covered in these black marks that cleaners would not remove....BUT did you know that hairspray is a secret weapon for these sorts of marks?...it cleaned up great! (as you can see in that first photo)


Next I had to tackle the interior.......it was rough....real rough.


I tore it all out and tossed it away.


now, I needed to rebuild the interior. Wanting create some structure, I used buckram (I had a roll of it left over from my costume building days)


Next, I created  fabric covers for the bits I had fashioned


Covered buckram was also used to create the "hinge"


Wanting to make sure that the top's interior would not pull away, I placed the elastic that runs through that shirred pocket all the way around. I added an extra piece of elastic to help hold things in place and created some loops of sorts that I may want to clip small items to.


This is how the back of this piece looked, wrapped around a piece of foam core and made so that it fits very, very tightly in its spot to help keep it secure


everything was firmly adhered using doubled sided carpet tape.


I am quite pleased with how it turned out.  All that remains to be done is to gather up the variety of supplies I want to live in this case.....ready to go at a moments notice.


Copyright Jill Buckley