This quilt was made with the intention of "busting my stash". It is finished, but my stash is only slightly dented. I find it interesting to see how the wonderfully all the fabrics work together as this quilt is made up entirely from a wide variety of fat quarters I had accumulated over the years....the exception being the duvet cover I used as backing and that neutral grey I purchased for the sashing/binding
you can find the earlier posts about this project here.
I made pillow shams to carry out the same look of the quilt. The backs are primarily made up of the last bits of scrap from the duvet.
Like the quilt, I did "big stitch" hand quilting using Aurifil's 12 wt variegated cotton, these lovely threads were also part of my stash.
I cut a gentle curve at the edge of this 106" x 90" quilt, so there is a lot of hand stitched bias binding.
Not sure why this one took so long, (might have something to do with hand stitching through layers of batiks and fusing) but for the most part, I suppose it kind of got forgotten and left on the back burner for a while, but it is finally finished .......hmmmm......but....there is still more stash waiting to be used. :-)
Monday, February 26, 2018
Thursday, February 8, 2018
Plain fabric doesn't have to be plain.
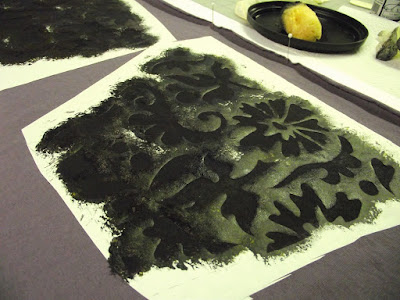
A few posts back I showed you a test piece I did where I created surface design by “removing” colour from a knit jersey fabric. Today you will see the same design...but this time, I created it using a DIY stencil, Jacquard textile paint and a sponge.
A friend showed me the work of Natalie Chanin of Alabama Chanin so you know this piece was somewhat inspired by her work but I am not planning to handstitch my garments together. I love hand stitched embellishments, don’t mind taking time to cut stencils and enjoy playing with surface design, but I am not really interested in handstitching all my seams. I recently ordered her book and am looking forward to seeing what her methods are and how I might want to adapt some of them for use in my own garments.
Now, for the most part the Alabama Studio way to apply paint to fabric is with an airbrush....at this point in time, I do not have one and it seems like a lot of trouble to keep clean and so on. For now, I am using a pretty basic technique by dabbing the paint onto the fabric using a small sea sponge.
I lightly marked my fabric to know where the edges of my pattern pieces would lie and stenciled within that area. To keep the fabric stable, I pinned it in place onto a piece of foam core which also gave me a slight "cushion".
Once the paint was dry, it was then heat set with a dry iron.
to add more interest, I began doing a simple running stitch with 12wt variegated cotton thread around the outer edge of each motif.
Next I cut out all of the pieces of my garment.
and assembled the tunic. (I own sewing machines and I know how to use them LOL!)
I created the cord using this vintage korking set
Subscribe to:
Posts (Atom)
Copyright Jill Buckley


