Showing posts with label tutorial. Show all posts

Friday, April 15, 2016

Cathedral Windows....in the round?

A number of years ago, I saw a finished quilt that was a two sided beauty...it appeared to be done using a modified version of a Cathedral Windows block...unfortunately, I never did learn the maker of the quilt or what the technique was called.....but.....back then, I did set out to figure out how it had been created, I posted my experimental resulting blocks  here
Over the years, I have received many requests for a tutorial on this technique.
So.....here is my attempt to show you what I did ....Warning! this is a long and photo laden post.

Like most quilts, it starts with templates and or patterns.....In this post, I will walk you through the general steps to creating the separate blocks and for those who want to give it a go, you will find a link to a PDF containing printable templates here
 
You will be cutting a variety of bits and pieces and circles to assemble into blocks....the more you make, the more variety you make, the more patterns you will be able to create with them when you stitch them all together.  This is a "quilt as you go" type of project.....AND while there is some machine work, the bulk of it is done by hand.

you will start by making a set of templates (thin cereal box cardboard works great for the "pressing" templates)


If you want to try a few different looks, cut several 6" circles, 2" squares, 3.5" squares as well as some 2" x 3.5" pieces (I also include a pattern to create that "split"circle)


in the photo above, you see the cut pieces ready to assemble (seam allowances are included in the pattern) and in the photo below....the machine piecing is done, the bits pressed flat


The goal is to end up with a variety of 3.5" squares and 6" circles (pieced and solid)
then we can begin the pressing, folding and stitching process

take one of the circles, (wrong side facing) knot the thread and then do a running stitch just in from the edge, once you get all the way around and back to the knot you are ready for the next step


 Place the cardboard template (5.5" circle) from the needle end, gently tug on the thread to pull in the circle...evenly distributing the fullness


It is time to go to the iron....press this well and remove the cardboard ...it should look like this


now you want to press those rounded edges in toward the center to give you a place for your 3.5" square (remember, to make this cardboard pressing template 3.75" square as the pattern file shows you)


Once again we head to the iron


can you see where you are headed? remove the cardboard template and in this cavity, place a 3.5" square of thin batting (I actually used flannel instead, it is that solid white you are seeing under the 4 patch) so you have 3 layers happening...the folded circle, a piece of batt or flannel and a 3.5" square (solid or pieced)


those "flaps" will be hand stitched in place. I chose to use small applique stitches, but you could just as easily use big Sashiko stitching or possibly a blanket stitch for an even more interesting look.

here is another combination of circle - square layering (this time using a split circle)


Every time you change the circle - square combination, you will have a "different" looking block....the combination of different blocks will create a large variety of larger patterns.

below, is a close up look at my stitching, when you have made a number of blocks and determined a layout you want to make into a quilt, simply place the blocks right sides together and ladder or whip stitch just as one would with English Paper Pieced Hexagons


so....that is the basics.....as you can see below, there is quite the variety you can make with just a few pattern pieces, let your imagination roam free and see what you can come up with.


keep in mind that the whole thing is reversible too.....depending on which way you assemble the completed blocks you will have two different looking quilts, front and back.

If you are like me, you need to get the fabric in your hands and manipulate it to fully understand the process......hopefully I have shown and explained it well enough to get you started.  I would LOVE to see what you create!

the nice weather is finally arriving, this would make a great project to have on hand for sitting and stitching out on the porch or perhaps for on those shop hop road trips  :-)


Thursday, December 24, 2015

Doodled-Painted Hexagons - Tutorial part 2

I tried to cover as much as I could in one post last time....photographically attempting to show you that various steps involved in the process.

Then I thought...gee...could I make a video? I have never tried to make /edit video before but decided to give it a try, so, I am hoping that together with my last post you will know what to do and perhaps be inspired to try it yourself.

This is the Rosette I created from the hexagons I am painting in the video.....and it is this rosette pattern that I am sharing with you. Download, print, and make your very own, I only ask that you link back to me when showing off your creations.  You can get the file here
Note: this rosette and pattern is comprised of 1" Hexagons....print at "actual" size.   If you want to work with a different size you may have to play with printing at the desired percentage


I am not providing instructions for the actual paper piecing part...you can find those all over the Internet as well as some great You Tube videos.  Check out my previous post for part 1 of this tutorial

I did it!...my very first video, my first time trying to upload to YouTube.....fingers crossed that it works!   The video covers the painting process....hope you find it helpful


I plan to try this technique in a variety of mediums......starting with these.....I have had this lovely set of watercolour pencils sitting in a drawer for years.....will they work?....lets find out


I began by testing the permanency of the colour on fabric. I doodled, laid on colour, activated with the Aloe-Vera Gel, let dry, heat set and then submersed it in water. It worked...the colours stayed put and equally as important, the hand of the fabric remained unchanged

In the image below, the hexagon on the left with just pencil applied....on the right the hexagon after the gel was applied


                                                               here they are left to dry


                                                         and this is the finished rosette


The process for this is just a little different than with paint, I will attempt to make another video soon.

Merry Christmas!  Nina Marie is hosting her "Off  the Wall Fridays" so I am linking up there where lots of creative stuff is happening

Friday, December 18, 2015

Doodled Hexagon Tutorial


For those of you who would like to try this technique, I plan to share a download-able, printable design for you to use soon.
But first I thought I would show the basic steps of the process.  Warning! this is a long post....but don't miss the ending...there is a money saving tip for those of you who are buying lots of pre-cut hexagons in packages

Note....Any time you will be drawing/ painting or inking fabric you always need to begin with one that has been pre-washed.

Supplies: 
White, off white or very pale coloured cotton
Freezer paper
Dry Iron
Frixion or other pen with disappearing ink
A light box or some other light source for tracing the design
Masking tape
Permanent marker .....needs to be waterproof for this process
Fabric paint (preferably transparent) or inks or Inktense pencils
Note....you need to test to make sure whatever you chose will not change the "hand" of your fabric as you don't want anything that will be prohibitive for the hand sewing process  (some paints/mediums leave the fabric with a plasticy feel which you most definitely do not want)
Aloe-Vera Gel   (the clear stuff....no colour)
Assorted paint brushes
Paper hexagon pieces  (I am using 1".....these measure 1" on each of the 6 sides)
A fabric glue pen or stick

Below, are the steps that will be done to each hexagon.

Step 1:  is to press freezer paper (shiny side down) to the wrong side of the fabric, the freezer paper will stay in place until each hexagon has been painted....it acts as a stabilizer for ease of drawing and painting on fabric

Step 2:  Add guidelines......using a Frixion pen ( or any disappearing marker) on the fabric's right side, trace around the outer edge of your hexagon


next add markings indicating roughly 1/4" seam allowance.


Trim close to the seam allowance


you are ready to begin drawing on the hexagon


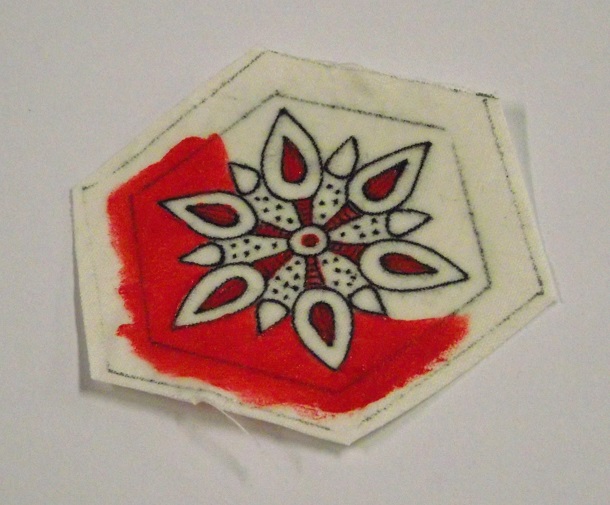
Step 3:  Using a light-box.....trace the desired design using a permanent, waterproof pen ( I use an ultra fine tipped sharpie marker)  notice that I have used a little bit of masking tape to secure my hexagon in place to prevent slippage


Step 4:   time to add colour.....there are a variety of ways to colour/paint fabric.....for this one I used Seta-Color transparent paint and clear Aloe Vera Gel
I first spread a thin layer of Aloe-Vera gel over the marked design/doodle. The gel makes the application of paint easy without worry of bleeding, running or having to thin the paint first...(use the paint straight from the bottle)

Begin in the center and work outward......I place the hexagon on a small piece of card-stock so I can rotate my work easily without having to handle the hexagon any more than need be


With a paint brush, apply the paint into the still wet aloe vera gel. (the gel has lots of "open" time....meaning that is does not dry quickly)....meaning you don't have to rush


notice that I am brushing the paint over the fold lines. I want to make sure that I have good coverage.


Step 5:   Set aside to let dry completely
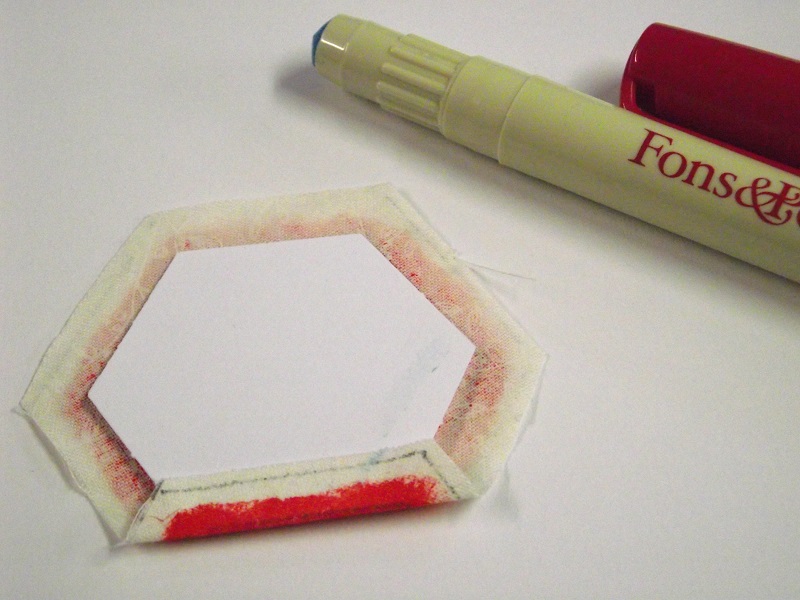
Step 6:  Now is the time to remove that freezer paper from the back of your work, place the hexagon face down and place (centering) a precut hexagon paper piece (use the light box if you are having trouble seeing the guidelines)


Step 7:  using a glue stick/pen lay a thin line of glue on the paper along the first edge you will turn Tip: keep it back from the very edge of the paper so that there will not be glue in the area you will later being stitching through   (For those of you who prefer the thread basting method.....well...you know what to do)

begin folding over each edge, one at a time, until the all edges of the hexagon have been folded to the wrong side


The fabric paint is permanent once heat set.....this is done using a hot,dry iron....at this point the hexagon is ready to be joined into a rosette.  using the same method, continue to prep, draw, paint, and baste the other hexies that will join in

I always test.....so to be certain that the method and supplies I chose to use will all be okay when subjected to water.....I did just that. I heat set this hexie, then simply stitched the hexie onto a piece of wool......which was then submersed it into a dish of water. (here it is underwater...the photo shows that there is no running, bleeding or lifting of colour)

once dry it came out soft pliable and with no loss of colour

I knew that if I want to able create many of these rosettes (like the one at the top of the post) I was going to be in need of lots of paper hexagons. I have purchased some pre-cut hexagons but holy cow...they run anywhere from $6 for 100 pieces to $7 for 50 pieces (depending on the brand) so I figured that had to be a better way


I found this Fiskar's "Squeeze" punch... it is simple to use, I can cut as many perfect hexagons as I like in just minutes.  1 sheet of card stock yields 20 pieces of the 1" size I am currently using. The cost of this cutter was regularly $30 but I had a 50% off coupon so I think it will pay for itself in no time.


just a note about products......for the single hexagon shown in this tutorial, Seta-colour transparent fabric paint was used....for last weeks rosette (shown at the top of the post), I used Jacquard textile paint, and for the one below, I used Inktense pencils...each "colour" product was used with the Aloe-Vera gel.....in the case of the Inktense pencils....I applied the pencil to the fabric first and then carefully painted the gel over top to "activate" the ink

Okay....so I think I have covered everything....but if you have any questions...leave a comment and I will do my best to answer them.....I will try to have a design ready for us to play with soon.


I am linking up to Nina-Maries Off the Wall Fridays where there is some fabulous inspiration being shared by many outstanding artists.....why not grab your favouite beverage, relax and check them out.

Saturday, December 8, 2012

Quilting....Free Motion, continued

In my last post, I talked about some of the basic steps I take when doing free motion quilting. In this post I thought I would share how I decide "what" to quilt.
It really depends on the quilt itself, if I am working on a utilitarian quilt, I will generally use simple shapes, stencils, feathers or basic meander. I let the size and purpose of the quilt dictate what I choose to do.

But art quilts are a different matter, art quilts tell a story and I want the stitching to continue the story. Below are some examples of ways that I use stitching to compliment the images on my quilts.

Sometimes I just add a little something in the background....can you see the spirals that break up the stippling?


pebbles stitched using pastel variegated thread kind of looks like snow
Simple "echo" stitching is often a great choice when you just want the stitching to stay in the background

Carrying an  image in your stitches out into the border  adds interest and continues the story. Here the roots spread out into the border.
In between the roots, I wanted the feel of earth, jagged, uneven stitching, pebbles and stippling worked well.
wavy lines and bubbles surround these turtles for a watery feel
This is another example trying to get the feel of the movement of water
sky.... gentle breezes

Sometimes, it can be as simple as following the pattern of the fabric, for excellent effect.

I just noticed....this is my 300th post.....Wow...have I really have that much to say?


Copyright Jill Buckley