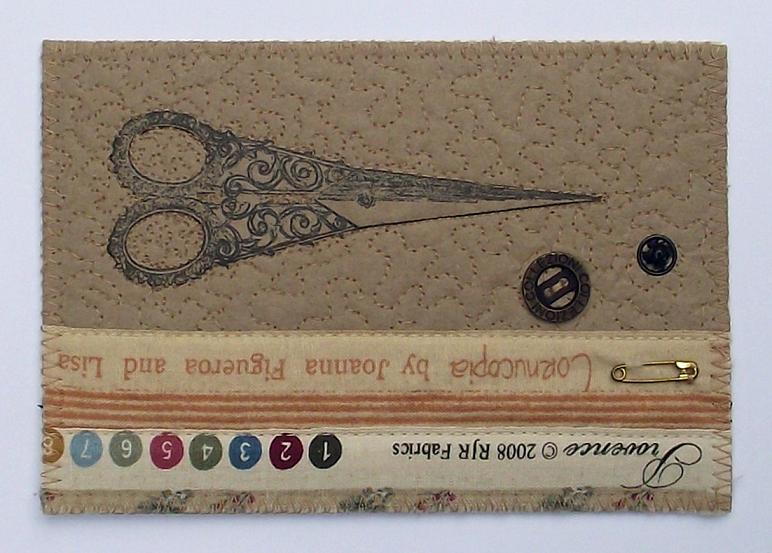
As you may remember, I was participating in an ATC swap with the Quilting Gallery, I sent mine off to Sheila Craigie aka.... aubirdwoman This is what she would find in her mailbox. (I also sent a small piece of hand painted fabric but I apparently neglected to take a photo of it)
Last week's CPP Prompt word was Bird, so when I saw the name of my swap partner's blog I thought this was perfect.
But, since I know that many of you enjoy seeing my doodles, I thought I would show you this one. It was done as a semi-secret project for a wonderful Internet friend. After completing this drawing, I printed it on cotton, did lots of quilting and entrusted it to the post office. I have learned that it has indeed reached it's destination.
In many ways, I am sure that the electronic age has lessened the amount of mail the post office sees, but at the same time, I think bloggers likely fill some of the void with all of the little packages that make their way around the world.
Showing posts with label postcards. Show all posts
Saturday, June 2, 2012
Thursday, December 22, 2011
Cards and snow?
I thought I'd post some of the cards I have made recently.
These were made using aluminum cans (beer and soda) as my metal for embossing. I showed how I do this here
For this one I punched holes through the metal so that the red from underneath could show through
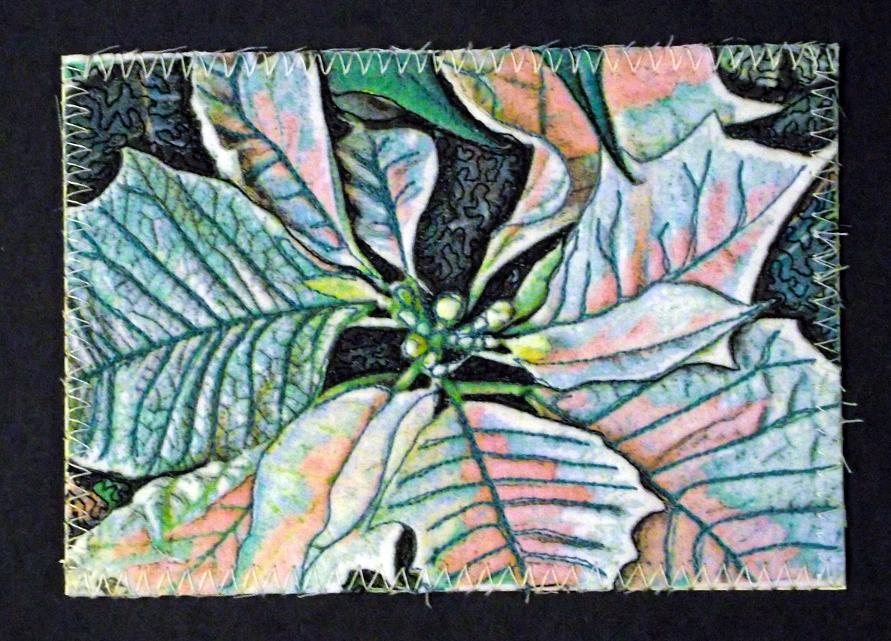
This card, is a photo from last years poinsettia which had been tweaked in Photoshop, printed onto fabric and stitched.
And since many people are looking for snow this time of the year (I am not one of them) I thought it was time for another "snowflake"
Last weeks CPP word was Cloud. What I immediately thought of, was Cloud 9 ......... I kept this one real simple and just drew various sizes of the number 9. Here is what the cut paper looked like before it was unfolded.

..........and after
These were made using aluminum cans (beer and soda) as my metal for embossing. I showed how I do this here
For this one I punched holes through the metal so that the red from underneath could show through
This card, is a photo from last years poinsettia which had been tweaked in Photoshop, printed onto fabric and stitched.
And since many people are looking for snow this time of the year (I am not one of them) I thought it was time for another "snowflake"Last weeks CPP word was Cloud. What I immediately thought of, was Cloud 9 ......... I kept this one real simple and just drew various sizes of the number 9. Here is what the cut paper looked like before it was unfolded.

..........and after
Labels:
embossing,
postcards,
printing,
snowflakes,
The Creative Prompt Project
Thursday, November 24, 2011
My most recent article
The Winter issue of The Canadian Quilter is currently showing up in quilters mailboxes across the country and contains my second article as CQA's Artist in Residence. This article is about creating quilted postcards, and while I do give instructions, hints and tips in making these little works, I also point out that they don't necessarily have to be made with fabrics. Unfortunately some of the text got omitted alongside the photos, so I thought I would take this opportunity to share with you what materials were used in constructing the top layer of some of the cards shown.This first one was made using a painted paper towel (heavily stitched) which was then embellished with rubber stamping, a few fabric scraps, beads and bits of broken costume jewelry.
This one, is again, paper toweling that had been painted, rubber stamped and stitched.
This is one of my favourites. It is just so simple, a plain brown paper bag (I think it was from the liquor store) was stamped and stitched. Selvage edges, buttons and a small safety pin finishes the look.
and these? well they are nothing more than pre-printed paper napkins found at the dollar store. Lots of stitching was applied to make some of the areas really stand out.
Monday, November 14, 2011
Play time.........and a beer?
Okay, well ......actually....the beer can was already empty when I got this idea.
I have wanted to try some metal embossing for a while now, but just had not gotten around to picking up any supplies.......you didn't think that would stop me did you?
So I began with a clean beer can, cut it apart (carefully because those edges can be quite sharp)
With the printed side of the can face up and those sharp edges taped down on to the cork trivet, I drew a design, pressing firmly with the pen, then, flipped it over and drew echo lines around those first lines, which really gives the design it's depth, the cork trivet has enough cushion to allow for a fairly good imprint. (it would be best to use a pen that no longer has ink but a little spritz of hairspray and the ink dissolves so it can be wiped right off)
I simply stitched these to some fabric covered Timtex and created postcards
Then I decided to do a slightly larger one......as you can see, I used a can of Moosehead for this one, repeated the process of embossing, but this time I stitched it onto a piece of Timtex that I had first painted black..........reminds me of those decorative tin ceilings.

I have wanted to try some metal embossing for a while now, but just had not gotten around to picking up any supplies.......you didn't think that would stop me did you?
So I began with a clean beer can, cut it apart (carefully because those edges can be quite sharp)
With the printed side of the can face up and those sharp edges taped down on to the cork trivet, I drew a design, pressing firmly with the pen, then, flipped it over and drew echo lines around those first lines, which really gives the design it's depth, the cork trivet has enough cushion to allow for a fairly good imprint. (it would be best to use a pen that no longer has ink but a little spritz of hairspray and the ink dissolves so it can be wiped right off)
Tuesday, September 13, 2011
No Waste
I hate to waste any of my art supplies and more often than not, when I have been playing with paints, I find that I have a bit extra leftover. I just can't bear to watch it get washed down the drain, so I add water to what is left to really dilute the pigment, then I sop it all up with wet paper towels. I think that leaving them to dry on a slightly scrunched plastic bag might help contribute to the texture. Here are a few that turned out kind of interesting. These have all been pressed flat, so what you are seeing is the way the colours dried, blended and the lines that were created. (click on the photos for a closer look)

What do I do with them? Well, this is a postcard I recently made for our quilt guild's exchange. The only "fabric" is that small bit of selvage edge, the rest is painted paper towel that has been stamped and heavily stitched.
Easy, simple, and best of all..........nothing is wasted
Thursday, February 10, 2011
What can you do with those tiny scraps?
Some time ago, I saw a post on Terri Stegmiller's site, Stegart showing how to do a Mosaic Collage with little bits of fabrics. This is something I filed away, wanting to try.....It is on a long list of things I want to get to.
I decided to give it a whirl on a very small scale. I chopped up some bits of fabric (these measure about 3/4" square), the hearts are a simple rubber stamp design on fabric, then coloured with inks, cut out with fusible on the back.
On top of a piece of Timtex, I added a layer of fusible web, on top of that, I laid out those bits of fabric. Using a dry iron and parchment paper to protect it, I fused everything in place.
When it came to the quilting, I found this foot that I purchased for my Janome 6600P very useful. It is easy to see through and allows you to free motion over those raw edges super easily.

I fused the hearts in place, trimmed it up and now I have a postcard ready for my guild's postcard exchange.
For some incredible inspiration and great ideas, be sure to check out 3 Creative Studios Look at the list of Free Projects to find Terri's Mosaic Collage Art Quilting Technique. She shows you step by step, how to do a whole art quilt with this technique (not just a background)
Aren't you just amazed by what other quilters share with us everyday? FANTASTIC!!!!
I decided to give it a whirl on a very small scale. I chopped up some bits of fabric (these measure about 3/4" square), the hearts are a simple rubber stamp design on fabric, then coloured with inks, cut out with fusible on the back.
Aren't you just amazed by what other quilters share with us everyday? FANTASTIC!!!!
Friday, February 4, 2011
Feathered Heart and Giveaway Winner
Thanks to everyone who entered, I wish I could send everyone a book but I could only choose 1 name........the winner is number 39 .....Joanne, Congratulations! I'll be in touch to get your snail mail info
btw (I counted the first 2 comments as one, since they were from the same blogger)
Now, I don't want the rest of you to go away empty handed so how about if I share this project with you. I wanted some extra clipart for my guild's newsletter, something valentine(y) so I drew this feathered heart and scanned it.
Then I thought how would this look stitched, so after tracing I did a little FMQ
of course, I could not leave it alone, so after stitching, I decided to add some colour.
In this case I used INKTENSE pencils.
Instead of wetting them with water I used a bit of clear aloe-vera gel with a small paint brush. See the how the gel makes the colour come alive? The photo below shows the right side having had a thin layer of gel applied on top of the pencil. By using the gel you have no danger of the colour bleeding.
I did mine on a small piece of fabric to turn into a postcard but you could do this any size you like.
So snag that black and white feathered heart imagine for yourself and play with it......stitch, colour ( use pencils, inks, crayons, paints, whatever you have) or even maybe try Zentangle patterns on it. Enjoy!
Now, I don't want the rest of you to go away empty handed so how about if I share this project with you. I wanted some extra clipart for my guild's newsletter, something valentine(y) so I drew this feathered heart and scanned it.
Then I thought how would this look stitched, so after tracing I did a little FMQIn this case I used INKTENSE pencils.
Labels:
Aloe Vera Gel,
Giveaway,
Inktense pencils,
postcards
Wednesday, December 8, 2010
Love these pencils........still not so crazy about TAP
Been playing with some new (to me) products as of late. I LOVE these Inktense pencils. Use them just like a regular pencil, but when you wet them, the colour blooms and becomes permanent once allowed to dry. If you desire a watercolour effect, allowing the pencil/colour to bleed......then water works great.........BUT if you don't want the colour to run and bleed out in your fabric you may want to try using something else to "wet" the penciled area. Here is a test I did. I first made several circles on a piece of fabric and coloured them using the Inktense pencils
Next I used various "mediums" to wet the areas and see how the pencil would be affected.
I have left these images large so click on them to get a better look. As you can see, there was lots of running with the use of water (and my brush was NOT saturated, I used as little as possible) The other items actually all worked quite well and the only one that significantly changes the hand of the fabric is the Golden Medium. I even washed the finished piece to see how well it would hold it's colour......result? Excellent!
Now......about TAP, Artist Transfer Paper. I thought that I would be able to dampen the TAP and then use those Inktense pencils because they "dissolve" in the water........but even though I worked as gentle as possible, it still rubbed the coating off and you just end up with a mess.........
so, I have found that the TAP works very well when using it with your printer but even though the reviews say you can draw on this stuff, you really can NOT, unless you are using a very fluid medium like ink, paint, or markers. Pencils, crayons, pastels and paintsticks all just scrape the coating off .....I found it quite disappointing.
I did make some cards though. After discovering that I could not do what I had planned with the images printed on TAP, I decided to go ahead and transfer them to fabric and then colour them after. Here are the finished cards.
Most of them are spoken for, but this one is up for grabs. If you'd like to find it in your mail box, please leave a comment in this post. I'll announce a winner Sunday.
Next I used various "mediums" to wet the areas and see how the pencil would be affected.
Now......about TAP, Artist Transfer Paper. I thought that I would be able to dampen the TAP and then use those Inktense pencils because they "dissolve" in the water........but even though I worked as gentle as possible, it still rubbed the coating off and you just end up with a mess.........I did make some cards though. After discovering that I could not do what I had planned with the images printed on TAP, I decided to go ahead and transfer them to fabric and then colour them after. Here are the finished cards.
Most of them are spoken for, but this one is up for grabs. If you'd like to find it in your mail box, please leave a comment in this post. I'll announce a winner Sunday.
Wednesday, December 1, 2010
Need a "Special" card?
Did you make cards when you were a child..........you know for Mom and Dad, Grandma and Grandpa......they always said how much like enjoy having a card made by you. Why did we stop, sure the card shop has a great selection but sometimes you want something a little different, something Special.

I thought why not use the process of making fabric postcards to create a greeting card in the same manner. Those of you who have purchased the book Zentangle Fabric Arts Quilting Embroidery will recognize this design. I took my design and after drawing it onto fabric, I doodled and added colour using ordinary crayons, backed it with a piece of Timtex, did some free motion stitching...........all the same steps as I would for a postcard...plus a bit of beading to make it sparkle.
The final step was simply to stitch it to the front of a blank card (I got a pack of blanks cards with envelopes at the "Dollar" store)........I think this is perfect for those occasions where you are specifically asked to bring best wishes only

I thought why not use the process of making fabric postcards to create a greeting card in the same manner. Those of you who have purchased the book Zentangle Fabric Arts Quilting Embroidery will recognize this design. I took my design and after drawing it onto fabric, I doodled and added colour using ordinary crayons, backed it with a piece of Timtex, did some free motion stitching...........all the same steps as I would for a postcard...plus a bit of beading to make it sparkle.
The final step was simply to stitch it to the front of a blank card (I got a pack of blanks cards with envelopes at the "Dollar" store)........I think this is perfect for those occasions where you are specifically asked to bring best wishes only
Labels:
greeting card,
postcards,
Zentangle Fabric Arts
Monday, November 22, 2010
Still TAPping
In an earlier post, I spoke about a product known as TAP (Artist Transfer Paper). Although there were some things I did not like about it, I know I will find many uses for it. Recently I took one of my feather designs, drew it directly onto fabric and coloured it using ordinary crayons. I quite liked the way it turned out and decided to use the TAP to duplicate this one.
So I scanned the original and then printed a couple of the images onto a sheet of TAP. Cut one out and transferred that image onto fabric using a hot iron.
The original is on the right and the TAPped version is on the left, finished as a postcard. I must admit this was kinda cool!
So I scanned the original and then printed a couple of the images onto a sheet of TAP. Cut one out and transferred that image onto fabric using a hot iron.
The original is on the right and the TAPped version is on the left, finished as a postcard. I must admit this was kinda cool!
Tuesday, November 2, 2010
Paper Towel as Fabric
Whenever I play with paint, I keep the paper towels used in clean up. I always think I will use them in some way. Yesterday I decided to create a paper/fabric postcard using one of these pieces and a recently purchased stamp.
This gorgeous stamp was purchased from the fun ladies at the Colouricious booth during the Toronto Creative Festival. visit their website to see the amazing array of fabulous hand carved blocks they have available.
I began with this paper towel
To the stamp, I applied textile paint with a sponge and just began randomly placing the stamp, pressing lightly in some areas and harder in others.
A mat with a 4 x 6 opening helped decide what part of the printed paper towel I wanted to use
Finished postcard and close up. I simply stitched a tight little stipple to enhance the appearance of layered leaves

This gorgeous stamp was purchased from the fun ladies at the Colouricious booth during the Toronto Creative Festival. visit their website to see the amazing array of fabulous hand carved blocks they have available.
Subscribe to:
Posts (Atom)
Copyright Jill Buckley