Showing posts with label Knitting. Show all posts

Saturday, November 17, 2018

Knitting and Math

I recently ordered a sweater kit from Craftsy, I have in the past, purchased several classes and was curious about the physical products they offer. There was a promotion that gave 50% off some of the kits so it was an excellent time to give it a try.


Part of that promotion provided a 1 month free trial of Bluprint..... now I must admit that having the month long access to all classes with Bluprint I am taking advantage by checking out classes I may have not done otherwise.

In one of the classes, Wear What You Knit, Perfect Sweater Fit & Style with instructor Sally Melville, I learned a nifty trick for re-gauging a knitting pattern. If you are like me, you often see a sweater pattern that you would like to knit but either don't have ( or don't like) the size of yarn called for. A simple math formula can be used to "regauge" the pattern so that you can knit it using the yarn you want..... how excellent is that?!!....I mean....Whoa! you can do this? I could not wait to test this out, I needed  to see if the math would actually work for me.

I chose to use the math from the Sally Melville class to try knitting a sweater from the class Choose Your Own Sweater Adventure with Eunny Jang. The sweaters in this class called for a chunky yarn with a gauge of 12 stitches over 4". Personally, I do not like to wear or work with heavier yarns, I much prefer to knit with finer yarns.  The yarn I wanted to use is giving me 22 stitches over 4" and even with a lace pattern the math is working and the sweater is coming along great. I love that in this class you can knit so many variations of the pattern(s) provided


trouble is I now have 2 sweaters on the go  :-)

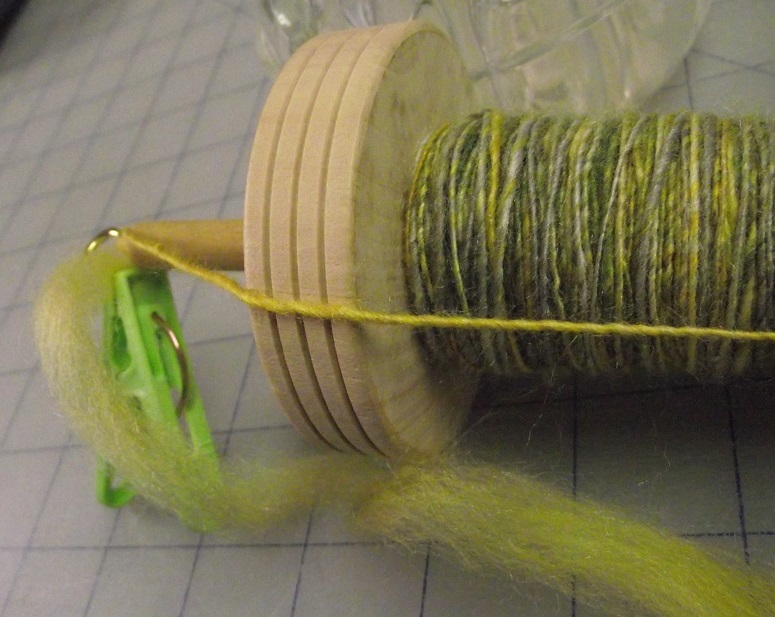
in addition to those classes I have also taken a number of classes about spinning and dyeing yarn and while I do not have a wheel, I find that I am able to apply much of what I am learning to the spinning I am doing on my drop spindles....as for the dyeing, well I am wanting to venture into dyeing my own fibre so you will likely see future posts on those experiments.

Here is a look at the fibre I have been spinning, the spindle on the left holds my spun singles, the spindle on the right contains the yarn as it has been chained plied (also referred to as Navajo plying)


and finally the finished yarn


here is a quick clip of me using my drop spindle


I have a few other things on the go as well so I hope to be back before too, too, long with another post


Saturday, October 20, 2018

10 years

Yes, it was 10 years ago today that I began this blog. I had no idea what I would be posting when I started, what I did know was that at the time I was finding that there were many generous people who were happily sharing ideas and inspiring others through blogs and I wanted to become a part of that.
For a great many of those years I posted on a regular basis ( usually at least once a week) but lately I seem to have drifted away from here and have not posted with much frequency. Perhaps I will regain my enthusiasm soon, or perhaps it has run its course. I guess only time will tell.

It is not that I have been idle, I have simply been lax in documenting the things that have taken up my creative time. But, while I am here I may as well show you what I have been up to lately. I seem to be drawn more to spinning and knitting these days.  I recently finished this sweater, it is cotton. I did not have a "sweater's worth" of the grey so I used some reclaimed yarn I had (in a post some time ago I showed how I had taken apart a sweater and dyed the resulting yarn) the blue denim-ish looking colour you see is that yarn....I kinda made it work, so the sleeves are a little different. I am actually quite happy with the way it turned out and more importantly it fits great.


I am still in the process of learning about spinning, while I have spun some fibre and am gaining confidence, my goal is to begin spinning yarns that I can actually knit with and like in the days when I began quilting, I am experimenting and finding out what works and what doesn't.

So far I have found that many of the tools associated with spinning can be rather expensive. A case in point is a Hackle. I wanted to experiment with blending fibre and creating the combed top I would spin into yarn, but soon discovered that a Hackle would run me $200 or more. What is a hackle? it is essentially a piece of wood with strong metal tines that you can use to separate and blend fibre. how hard could it be to make? I decided to give it a try.

I started with a discarded piece of wood (looks to be from a frame maybe) I went to the hardware store and bought the longest finishing nails I could get. ( 4" ) In order to get my spacing fairly even, I  first marked the increments on a piece of masking tape. I laid the tape in place and began drilling smalls holes at each point.
note the block of wood, it was there to prevent me from drilling into my desk


then it was just a matter of hammering the nails through each drilled hole


I will likely try making another, this time placing the "tines" a little closer and see if I can find a thinner nail, BUT this actually works pretty good. (oh...and it cost me $1.43 to make) I tried blending some white and red merino.


I did not have a proper "Diz" to pull the fibre through, but that plastic knitting gauge worked just fine


now to give it a test spin.


Tuesday, August 22, 2017

Fluffy Fibre......to Knitted Stitches

I am still working out how to spin on my DIY drop spindle.
I began with that 3.5 oz braid of dyed roving that I purchased from a local vendor....after reading tutorials and watching youtube videos, I gave it a shot.....I showed my first "test" subject in an earlier post (here), today I thought I share the process from start to finish.

In order to create plied yarn, I would need 2 balls/bobbins/skiens of spun roving. I broke off 2 equal (roughly) sized amounts of roving and began spinning......once I finished each chunk (my spindle was reasonably full)  I would need to take it off, keep the 2 separate....then find a way to ply (twist) them together to make my yarn.

spun single in progress.

So I decided to make myself what is referred to as a Lazy Kate (or maybe just a "Kate"?)
I happened to have these vintage bobbins on hand (they were simply decorative with my sewing collectibles) once emptied, they would be perfect.


I gathered some supplies.....a sturdy box (gift box from the dollar store) a few knitting needles from my stash of many many duplicate needles (knitters out there know about that LOL!) and some binder clips


 I wound the "singles" off the spindle onto each bobbin


I attached binder clips to an extra knitting needle as guides to keep the fibre from getting all tangled


The spun fibre glided off the bobbins quite smoothly as I plied them together (back onto the spindle.)
Once the yarn was "plied" the next step would be to "set the twist" and to do this I would need something I could wind the yarn onto that would keep some tension and allow me to immerse it all in a warm bath......so I needed to make what is called a "Niddy Noddy"
I went to the hardware store and purchased some PVC pipe 1/2".....2 T connectors and 4 end caps.
note: the grey PVC is found in the electrical dept and is almost half the price of the white PVC found in the plumbing dept)

Because the yarn will wrap around 4 times for each pass.....my center pipe measurement at 12" will give me a 4' long skein. The bonus is that this can be taken apart, laid flat and if I wish, I can create different lengths of skeins by changing the center pipe length


The image below shows the yarn wound on the niddy noddy, along with the resulting skein of plied yarn.

Next I wanted to see if I could set the twist on a single ply. I am so pleased with how it turned out!
how amazing to be able to take fluff


and turn it into yarn with some pretty basic tools, this is a swatch I knit with my single ply yarn, to give you an idea...it was knit on size US 0 needles


This is a slow process, but it is so gratifying. I have found it so relaxing...and when I spin, I seem to loose track of time.

I have to tell you a story.....when I purchased this roving at a local craft/art show, I had asked the vendor how much yarn I should expect to yield from this particular braid. Her answer was that it depended on how thick or thin I would spin it. (okay that makes complete sense) so I replied as an example DK weight??? Well...a customer standing at the same booth, rolled her eyes and basically made a pffffftttt sound....turned to  me and said (insert condescending tone)...."oh...if you are just learning to use a drop spindle you WON'T be spinning anything THAT thin!"  uh .....yeah.... thanks for the encouragement.....perhaps she was trying to be helpful.....but her tone and body language said otherwise.
So as you know, I do LOVE a challenge......don't ever tell me what I can NOT do! But that is me.....someone else might have been so discouraged by that remark that they may have not tried at all and miss out on the of joy this art.


Friday, April 28, 2017

Following and Creating Knitting Charts

Sometime in March of this year, I took an online class through Craftsy, a knitting class using stranded colourwork techniques. The class project was perfect for using some of the yarn I had reclaimed from sweaters.  While I have done colourwork and Fair Isle in the past....I had not taken the time to learn the proper way to do it and my work was never as neat as it should have been.

Once I got used to a different way of holding my yarn, I picked up the technique quickly. This Cowl was the provided pattern from the class (which you can find here


look how neat it is on the inside


of course....now I wanted to see if I could create my own charts. I accomplished this with the help of an app I found, called 8BitPainter (it is meant to be used for drawing simple pixel art) but it works great for creating needle work carts too.  In the photo below, you can see the chart I created with the app on my iPad mini, and the cowl (in progress) I knit following my chart.


Such fun to be able to combine needlework techniques with modern technology.


Monday, February 20, 2017

Knitting with reclaimed yarn

Okay, I seem to be stuck in knit mode currently.  I deconstructed another sweater.
This one was labeled 70% Cotton / 30% Lambs wool. 


This is a look at the amount of yarn I managed to salvage, (roughly 340g ) and the start of my very first sock


and here is the completed sock, now to see if I can actually make its twin


Saturday, February 11, 2017

Reclaiming and Repurposing yarn

My last post was about deconstructing a thrift shop find. My first test subject, a 100% cotton sweater. It has provided me with a good amount of yarn to play with as you can see in the photo below.


I dyed some of it a sort of, mottled, dark, Denim-y blue and left the rest that natural cream colour.


It is lovely to work with, soft to the touch with such wonderful drape. 
here is a peek at how it is currently looking on my needles


I am rather surprised at the amount of yarn I managed to reclaim. (what you see in the bin in the top photo along with what I have already knit)......it appears that I will have enough for a couple of projects

Wednesday, January 25, 2017

Deconstruction....reclaiming yarn

Those of you who visit this site know that I like a challenge, that I like to "try" playing with fiber in a variety of ways.  As with most creative types, I have many interests. One of them is knitting and as is true with much of what I like to do, it is more about the process than the finished product.

Not long ago, I happened upon a video featuring a gentleman who deconstructs sweaters to reclaim yarn with which to knit. That caught my interest immediately. If you are a knitter, one who prefers to use quality yarns, you know it can get expensive in a hurry.....but this was less about saving a few bucks and more about experimenting (cause let me tell you...I have discovered it is a time consuming endeavor)

Anyway, at a thrift shop, for a $1.76, I found a large sized, 100% cotton, man's sweater. It was clean with no holes and looked to be a great candidate for disassembling


it did take me a couple of hours to get it apart, it is likely the most important part of the process because if you are not careful and cut into those edges...you wont be getting nice long continuous yarn ( to give you an idea.....I am getting anywhere from 100m to 300m of continuous yarn in each ball)


once I had a piece turned into a ball, I put it into skeins it so it could "un-kinked". (see how kinky it was)

after a warm bath it is relaxed


I even tried a couple of dye tests.


it is knitting up wonderfully......the photo below is showing the cream ( which is the reclaimed sweater yarn knit in seed stitch)  draped along with something I had previously knit using a decently priced cotton yarn....I really can't tell the difference in the feel and drape.


Monday, February 3, 2014

Top Down Knitting

Like just about every quilter, I enjoy a variety of needle arts, and like everyone, I am better at some things than others. I like to knit but don't consider myself really very strong in that area. While I can keep my stitches fairly consistent, I tend to knit a lot and rip out even more because I am rarely happy with the fit. When you begin a sweater at the bottom and work your way up....you get what you get.

Recently I came across "Top Down Knitting" with this method, you start at the neckline and work your way down. The best part about this is, that you can place your work onto a waste yarn and try it on as you go. So far I am really liking this.


Just as in my quilting, I do like to challenge myself. This pattern has cabling....these are my first cables .....I have discovered that they are much easier than they look!


Since taking that photo, I have gotten to an area where I will just be knitting until I get to a certain length, keeping the cable stitch pattern correct. So...instead of having the whole (7 page) pattern with me. I created a little "laminated" chart that I can mark each round with a whiteboard marker to keep my place. Once I have completed the full chart I can wipe it clean to start all over.


I simply printed the chart, glue stuck it down to an index card and then used packing tape to laminate it.

Edit:  The pattern I am using, is an Amanda Lilley Design, which I purchased it through Craftsy.... you can find it her patten here
Copyright Jill Buckley