Showing posts with label printing. Show all posts

Thursday, July 14, 2016

Making a Stencil with Window film

My most recent post talked about using technology in my process, using my iPad and an app called Concepts, I had created an image that I wanted to turn into a stencil that would allow me to print in a variety of ways.


First, let me show you some of what I did.......then I will show you the simple method I used to make a durable, re-usable stencil......or just skip ahead  :-)

Once I made my stencil, I got out my screen printing supplies. (they had been sitting unused for a very long time)


I flooded the screen with ink and then set it down on my stencil which allowed it (the stencil) to "stick" to the underside of the screen. Here is a sampling of the images I pulled. Several are on plain black cotton and the rest on a variety of hand dyed fabrics.


Now, you might say....why would you want a bunch of white prints like that?.....well, the answer is that I can go in now and add colour......a little or a lot.
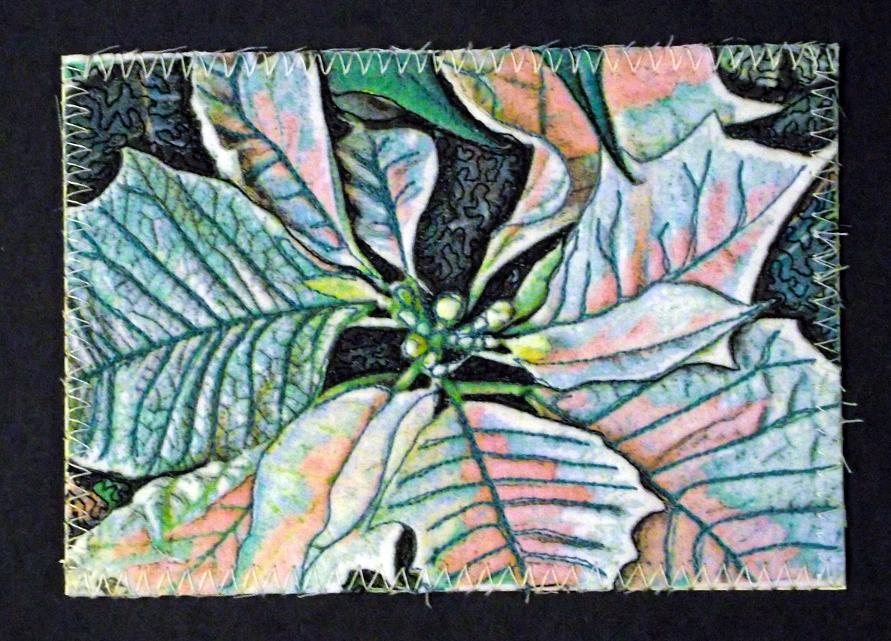
this is an example of one of the white on black prints that I added some colour to using Tsukineko inks and Aloe gel.....subtle blues and greens


But one could go crazy and add some wild colour too........ this one below, was a "test" of a bunch of different things, paints, markers, inktense pencils, dye sticks and what ever else I got my hands on just to "see" what would happen.....the result is pretty jarring but it was a good way to learn what works and what doesn't while only ruining one print ( something like this could work well if you want a stained glass effect)


I also used the stencil ....as...well...a stencil.  I laid it on top of this commercial fabric and "stenciled" with Seta-Color fabric paint......after being heat set, it is nice and soft and perfect for the addition of hand stitches


As you can see I used this stencil in a variety of ways....and had to clean it several times. When I used the silk screen, I forgot to remove it before I went to rinse my screen so it got a real scrubbing. I was a bit concerned as this is how it looked after that initial cleaning


Yikes!.....but no worries, I placed it between some paper towels and left it to dry weighted with a heavy book ....it dried flat and I have continued using it with no problems.

Dry and ready to use again and again
as you can see.....I have used it many, many times and it is still holding up well.


Okay....so...Want to make your own stencils? unlike using freezer paper or cardboard (that are often only single use), this method gives you a stencil you can clean and reuse. The bonus is that you can make it pretty much any size you want.
Here is what you need.....your image (I just printed my design on regular printer paper), a sharp pair of small scissors (or craft knife if you prefer), an awl, and window film.....yup...window film, that clear, sticky plastic stuff that comes on a roll applied to windows for privacy, available at home improvement stores among other places.


cut 2 sheets of the window film, allow a couple of inches all around the image you will be cutting. You are going to be trapping the image between these 2 sheets


Take the 1st sheet and carefully peel back the release paper enough to place your image on the sticky side


then place the next sheet, sticky side to sticky side and slowly, carefully, peel the release paper away....(sorry I really could not do this and take photos at the same time....hopefully you get the idea.) the end result should be your image trapped between these two layers of clear window film. You want to take care that you have a smooth flat surface with no bubbles.  I also used a roller/brayer to make sure I had a very tight seal.


now comes the fun cutting part.....just like with my method of paper cutting.....I take the time to determine which areas to cut first, I poke some tiny holes with an awl to allow my scissors access


I generally cut the smaller more difficult areas first


and continue working my way through the entire design, bit by bit.


and there you have it......a flexible, durable, re-usable stencil. 


Even if you did not want to make prints.....this would be a great way to make quilting stencils that could be used with chalk, pencils, or Pounce pads to transfer the design.


Thursday, December 22, 2011

Cards and snow?

I thought I'd post some of the cards I have made recently.
These were made using aluminum cans (beer and soda) as my metal for embossing. I showed how I do this hereFor this one I punched holes through the metal so that the red from underneath could show through
This card, is a photo from last years poinsettia which had been tweaked in Photoshop, printed onto fabric and stitched.
And since many people are looking for snow this time of the year (I am not one of them) I thought it was time for another "snowflake"
Last weeks CPP word was Cloud. What I immediately thought of, was Cloud 9 ......... I kept this one real simple and just drew various sizes of the number 9. Here is what the cut paper looked like before it was unfolded.

..........and after


Wednesday, June 30, 2010

Glyph

Yup "Glyph" is the Creative Prompt Project's word of the week. A Glyph, is essentially a pictograph or other symbolic character/sign, sometimes cut into a surface or carved in relief.
I had a bit of fun with this one. First I drew my zodiac symbol........ Capricorn.
Next, I finally got around to trying Lino-Cutting. It is something I have wanted to try for awhile. I began by purchasing the basic lino-cutting tools and a piece of linoleum to carve.
I drew a fairly simple pattern which, once carved, resulted in this block/stamp.
I lightly brushed transparent fabric paint onto the block using a fairly stiff brush so that odd little lines would be left behind. I started with one colour and gradually added another as I continued to make the print. Here is the stamped fabric. I can see where the carving needs to be "cleaned" up a little, but I am quite pleased with my first attempt.
Can you imagine the fabulous possibilities that might be achieved by employing this method of print making?

Tuesday, April 20, 2010

From Logo Design to Quilt

After having my design chosen as the logo to be used for next year's CQA event, I decided to see if I could turn it into a quilt.
On a white tone on tone cotton with a vine and leaf motif, I painted in the colours I wanted.
I probably could have gotten away without piecing the circle, but I did want to be able to tuck the tree roots into the seam.
So the blue was painted, the tree trunk and roots are actually Lutradur cut with a heat tool. I painted the outer circle yellow, being careful to leave the flying geese area blank so it could be treated separately.
I hand lettered the text using a micron pen. I also used the micron pens on plain white cotton to re-create the designs on fabric for the "foliage" on the tree.

I thought I'd apply something a little unexpected to the binding so I began by printing a sheet of text on cotton which was then cut on the bias.
The broken black outline of the circle is hand stitched while the rest is free motion machine quilting.

Here is the finished piece, it is titled "Coming Attraction"

Thursday, April 15, 2010

Finished!

These postcards went together quickly, I put my printer to work, (always cross my fingers as the printer grabs the fabric) tried a new stitch, & practiced a few favourites.
They are now finished and in the mail.

Thursday, March 25, 2010

Simple ideas

Lately I have been working on a project involving lots and lots of 2" squares being sewn into 9 patch blocks. Even though I want a scrappy look, I do want to sew each one exactly as I put them together on the design wall.....( large piece of fabric covered Styrofoam)
The problem is that I really could not find a comfortable way to use my "design wall" at the sewing machine. Here is my solution. I simply transferred each set of squares onto regular 8 1/2 x 11 printer paper. Now I can easily bring the stack next to my machine to stitch, keeping everything in it's intended order. There are 40 blocks ready to sew just in the stack you see here.

Another idea I had this week was to create a card to have on hand for those times when I am asked "where can I see more of your work?" This way, I will have something to give out rather than searching for a scrap of paper to scribble on. I decided that I my recently doodled mouse could be mistaken for a rat...........A Quilt Rat, that is. So using my computer and a package of perforated business card blanks I created a stack of these. Now I am all set for a few of those meet the artist evenings I hope to attend this spring.

Wednesday, August 26, 2009

Prompt #28 and Printing


The creative prompt number 28 is blue. First I did this drop.........is it a raindrop? a teardrop or perhaps a drop of blue blood? you decide. Now if you happen to be a reader of Kathy's Quilts you will know that she is very fond of blueberries and that is what prompted this one. Click on Clara the Cow on my side bar to learn more about the creative prompts, come join in.

My most recent post showed several fabrics I had painted and plan to use for postcards, here they are after spending some time being run through my printer. Now they are ready to "embellish" with thread, more paint, inks and possibly even some beading.
In the past, whenever I put fabric through my printer I kinda held my breath and hoped for the best.
It is always so annoying to have a nicely prepared piece get jammed in the printer and even though I make sure that the fabric is thoroughly adhered to freezer paper it can still happen.
Over the last couple of days I have run more than 2 dozen sheets through the printer with each attempt being successful due to the following extra step.

Once I have pressed the fabric to freezer paper and cut it to size, I then zigzag stitch it to a piece of card stock. Just the bottom edge is all it takes and now there is no curling or separating which is usually the reason for a bad result.

Edit: I forgot to mention that you want to be absolutely sure you clip those threads tails completely off. You don't want any loose thread that can get pulled into your printer and do nasty things.

A friend is moving from her home that she has lived in for more than 50 years in which she raised 5 children. I send her postcards every now and then, I wanted to send a special one for this particular move.
I took a photo of her home, played in my Photoshop program and came up with this. I plan to send it to the new apartment and hope she will like it when it is complete.


Please go over to Quilt Hollow's site and read her 2 most recent posts. It involves Etsy and what you need to do to ensure that you keep your name should you ever decide to become an Etsy seller. She found out too late that someone else has taken her name, not actually using it, and tried to sell it to her (Etsy rules do not allow the selling of a name) She is urging you to register your name there. I have, even though I am not selling anything on Etsy at this time, this way I can be sure that in the event I wish to in the future, I will be able to keep the identity people associate with me and my work. It takes only a couple of minutes and cost nothing.

Thursday, August 13, 2009

Postcard backs and this week's doodle


This week's creative prompt word is house. Here is my response.

How do you make your postcard backs? Up until now I have used cotton on which I have transferred text using various methods such as the use of T shirt transfer paper, printing directly onto the fabric as well as some photocopy transfer techniques. While these all get the job done they can be time consuming and at times, expensive methods. I like the backs to be neat, tidy and legible, something I don't always achieve when I do it by hand.
While attending this year's Grand National quilt show (all postcards), I noticed that several artist's were actually using some form of paper on the backs of their cards so I began playing with the idea of printing on card stock. It works great but since printer inks will run and bleed when they get wet you need to take it a step further cause you can't always count on the mail staying dry. You can do several things, one is to simply make your finished card it's own clear envelope............I cut the "zip" off a zip lock sandwich bag, it is the perfect size to slip the card into and tape closed after you have had the stamp hand canceled, I checked with the postal outlet and was told this was a quite acceptable way to post these. If you don't want to do that you can photocopy on card stock ( photocopies don't run) I checked with Staples to be sure this could be done at the self serve copiers and they assured me this was no problem. Using my computer I created the back you see here complete with my "signature" initials.
Two fit nicely on a standard 8.5"x 11" sheet, just think of the possibilities.

Doodles that I had previously printed were made into cards this week. I think most, if not all of my prompt doodles will become postcards.....might be some giveaways in the future.
I played with paints and inks on both the foot (journey) and bee (queen), I like this look much better than the colour pencil.
I love to do free motion stitching so the postcards make a great excuse to sit and play. A hot dry iron and some fusible web was used to secure the back of the card then I stitched as I would normally. Take care not to stitch too densely.

Monday, August 3, 2009

Creative Prompt "Remember" & print play


Creative prompt #24 was Remember and in response to it, I decided to doodle a diary. Too bad I can't find the key....might be some interesting stuff in there.

I also spent a little time transferring some of my previous doodles to fabric. Some were printed directly onto fabric while others were done using a photocopy transfer method involving the use of a solvent. Then as you can see I added a little colour to a few using coloured pencil and textile medium. I don't really care for the added colour all that much. ( I much prefer those black and white or grayscale images), however, I kinda like the way the exclamation mark looks.
I am planning on turning these all into postcards at some point but for now just testing a few ideas. Gotta make more play time and get out the paints and inks.

If you are new to my blog and want to know more about these creative prompts or possibly join in,, click on the picture of Clara the Cow on my sidebar.

Wednesday, April 15, 2009

More Print Play and a Postcard


Welcome to my 50th post. Not that it will be all that exciting. Just wanted to show a few more possibilities when making prints using paper backed fusible web. In my last post I mostly used fabric paints but then I thought what about some other simple items.
This postcard is done entirely using coloured Sharpie markers. I drew my letters in reverse, added stripes, dots whatever came to mind and then pressed it onto my fabric. The result is as clean & sharp an image as what I began with. Then I thought what about stamps, crayons, pastels? Take a look at this sample. The pink "feather"was first drawn (outline only) with a Sharpie marker then the area was filled in with crayon, I used a pink and then blended a little yellow in some spots. You do need to be careful and not apply too much pressure as the web can tear fairly easily. The green "feather" is the result of oil pastels and the little flowers are a rubber stamp and ink. Now I don't have a large stash of art supplies and the nearest Art supply store is about a 20 minute drive so I thought you'd like to know that the crayons, ink and oil pastels I used here, all came from the dollar store.
So you don't have to lay out a lot of money to experiment and play with images on fabric.

Thursday, April 9, 2009

Print play


One of the things I like most about art quilting is having the freedom to play and discover new ways of creating interesting effects. I have been playing with making prints lately. I had read that you could make prints using fusible web and found that to be something I'd like to explore. So here is what I found. First I started by painting a very watered down setacolour fabric paint wash onto the web side of paper backed fusible web. I let the paint blend and run, then left it to thoroughly dry. I cut this "feather" shape and simply applied a hot dry iron. The print is quite spotty because the actual amount of pigment from the paint varied greatly across this first sample. Okay, but could this be subjected to water? I set out to answer that question. I cut and ironed some small random shapes, submerged and agitated it in soapy water, wrung it out let it dry and then pressed it using parchment paper as a shield and it looks great, no colour loss at all.

I then tried this same idea using inexpensive crafter's acrylic mixed with a bit of textile medium, painted this feather (left)
cut it out but only the general shape leaving some unpainted web to see what would happen and repeated the pressing process.
This works as well but left the painted area of the fabric with a slightly rubbery texture. This sample also passed a quick wash test.

Now I like the idea of being able to print a shape with out
any intricate cutting so I painted directly onto the web once again this time using a watered down setacolour paint, as you can see there was some bleeding which could lead to some other interesting effects especially with added thread painting or beading but in the end I cut each section separately and got a sort of stencilled look. I will continue playing to see what can be achieved. Imagine the possibilities!
Copyright Jill Buckley