Showing posts with label Blog-versary. Show all posts

Saturday, October 20, 2018

10 years

Yes, it was 10 years ago today that I began this blog. I had no idea what I would be posting when I started, what I did know was that at the time I was finding that there were many generous people who were happily sharing ideas and inspiring others through blogs and I wanted to become a part of that.
For a great many of those years I posted on a regular basis ( usually at least once a week) but lately I seem to have drifted away from here and have not posted with much frequency. Perhaps I will regain my enthusiasm soon, or perhaps it has run its course. I guess only time will tell.

It is not that I have been idle, I have simply been lax in documenting the things that have taken up my creative time. But, while I am here I may as well show you what I have been up to lately. I seem to be drawn more to spinning and knitting these days.  I recently finished this sweater, it is cotton. I did not have a "sweater's worth" of the grey so I used some reclaimed yarn I had (in a post some time ago I showed how I had taken apart a sweater and dyed the resulting yarn) the blue denim-ish looking colour you see is that yarn....I kinda made it work, so the sleeves are a little different. I am actually quite happy with the way it turned out and more importantly it fits great.


I am still in the process of learning about spinning, while I have spun some fibre and am gaining confidence, my goal is to begin spinning yarns that I can actually knit with and like in the days when I began quilting, I am experimenting and finding out what works and what doesn't.

So far I have found that many of the tools associated with spinning can be rather expensive. A case in point is a Hackle. I wanted to experiment with blending fibre and creating the combed top I would spin into yarn, but soon discovered that a Hackle would run me $200 or more. What is a hackle? it is essentially a piece of wood with strong metal tines that you can use to separate and blend fibre. how hard could it be to make? I decided to give it a try.

I started with a discarded piece of wood (looks to be from a frame maybe) I went to the hardware store and bought the longest finishing nails I could get. ( 4" ) In order to get my spacing fairly even, I  first marked the increments on a piece of masking tape. I laid the tape in place and began drilling smalls holes at each point.
note the block of wood, it was there to prevent me from drilling into my desk


then it was just a matter of hammering the nails through each drilled hole


I will likely try making another, this time placing the "tines" a little closer and see if I can find a thinner nail, BUT this actually works pretty good. (oh...and it cost me $1.43 to make) I tried blending some white and red merino.


I did not have a proper "Diz" to pull the fibre through, but that plastic knitting gauge worked just fine


now to give it a test spin.


Monday, October 20, 2014

and then...the UNEXPECTED happed

It was Oct 20, 2008 when I began this blog ....I did not know then where it might lead...one thing for certain, is that I have learned a great deal and continue to do so.  Most of the time it is simply out of curiosity, sometimes it is because I am asked a specific question. Today's post has come about because of a specific question, one that I was asked just last week.
The question was about dyeing fabric. I was asked about the supplies I use, the dyes.....and honestly, I am not quite sure what the dyes I have been using are ( they are old...from the 70s, maybe early 80's) they are a powder, come in a small brown envelope and are made up of very intense, concentrated colour...but I don't really know anything about them...are they "fibre-reactive"...or acid? I dunno....those of you who visit regularly, know that I don't worry about knowing the specifics...I don't get caught up in branding and terminology......I rarely follow instructions....I experiment, play...I "TRY" and from that, I find what works best for me.
The specific question was....can my recent dyeing experiments also be done using Rit dyes? (you know, those little boxes of dye that have been around forever and that can easily be obtained without having to find a specialty shop or order online) I happened to have a couple of boxes leftover from many years ago, back then when I used the Rit dye...I "cooked" it on the stove.....they always worked great that way...but could I use them the way I have been using these other dyes? I set out to find the answer.
This is a long post and photo heavy...BUT there is a surprise ending so if you are interested, come back when you have time to read the whole thing.
I gathered the basic supplies....Rit Dye, pre-washed 100% cotton, Soda ash, a paper mask, rubber gloves, plastic containers, freezer bags, and blue Dawn dishwashing liquid.
I am often asked about the soda ash...you can get it in a variety of forms, I found the Tulip brand at a major craft retailer, the Jacquard brand at an art supply store and the big container of pH Plus at a pool supply company...they are all the same thing  (Sodium Carbonate)....it is much MUCH less expensive at the pool supply store.

Soda ash (different packaging)
for this experiment, I used Rit dye,and prepped the fabric with pH Plus (soda ash)
here is the process I used, I began by soaking the fabric in a soda ash solution, the ratio of soda ash to hot water is 1 cup soda ash/gallon of water............for this experiment I used 1/4 cup soda ash in 1 quart of water as I was only dyeing a few small pieces.
Left it to soak for about 30 minutes.


I use this method to acheive nicely mottled effects....the soda ash pre-soaked fabric now gets placed into freezer bags....the more rumpled and scrunched, the better


Note: when working with the dye powder you want need to wear a mask (you do not want to be inhaling that fine powder)
As you can see, you don't need a lot of the dye powder


 I put a bit in the cup and then add just a small amount of water to create a wet paste....once I have it at that stage, I can remove my mask.


Next I need to add "hot" water, for this experiment, I did not bother to boil it, I simply used the hottest water I could get directly from the tap. What is most important is that you get all the powder dissolved.  Again.....you don't need much. (I did not measure but you can get the idea of volume....those are small sundae cups)


Now, I am ready to pour dye solution onto the fabric in the bags.....just a bit...it doesn't need to swim. If you like, you can use a few colours (keeping in mind that complimentaries will make mud) then you squish and squeeze to allow the dye to begin to work its way into the fabric. The more you squeeze the less mottling you will get.


I decided to test one piece by dyeing it without the benefit of the Soda ash pre-soak, it went into it's own freezer bag just having been thoroughly dampened with plain water....I expected that this piece would not suck up as much dye as the others....but....(something VERY interesting and unexpected happens)
Once I feel that I have the dye worked in enough, I seal up the bags.....cover the whole works with an old rag towel and leave it to sit overnight. (I leave it in my laundry room, where the furnace is, so it is in a nice warm spot)
The next day the bags can be opened and the fabrics rinsed....and rinsed and rinsed...(the dye process does use a lot of water) the goal is to remove all of the unused dye..(the fibers can only take in a certain amount of dye...the rest has to be washed away so that you will be left with fabric that will not continue to run/bleed......your goal is for the water to run clear.
I start this process by first rinsing each piece pretty well with plain water, then I use some blue Dawn dishwashing liquid...a few drops is all that is needed....it usually pulls out all that dye that did not penetrate the fabric


but wait!..it isn't working this time...to be specific...it isn't working on the fabrics that were pre-soaked with soda ash...I can not seem to get the water to run clear as I normally do...BUT it is working with the lone piece I dyed that had NOT been soaked in soda ash....hmmm strange but as you can see....I am always learning too.
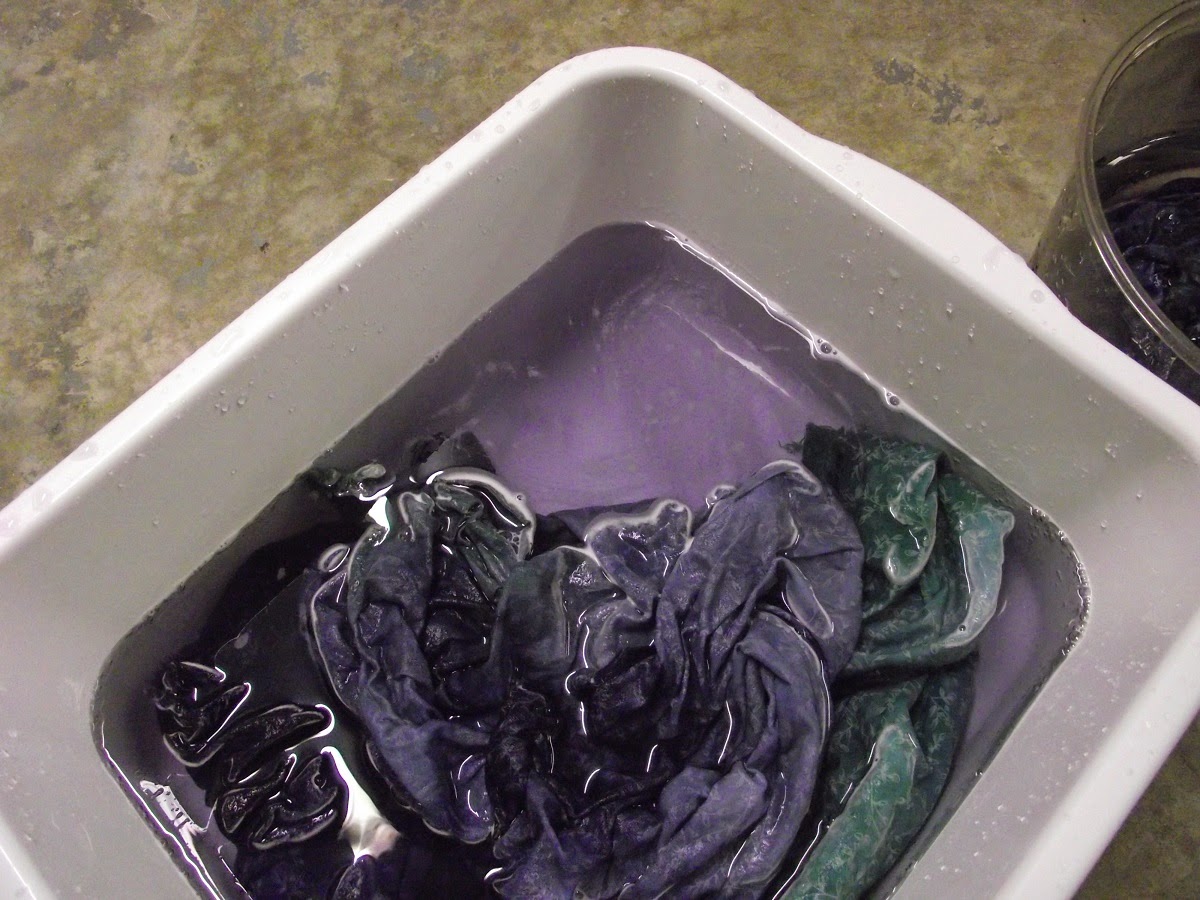
notice that the water is still showing a lot of colour (this was after many MANY rinses)

managed to get to clear water pretty quickly with this piece (the one that was not soda ash soaked)

I don't know why....all I know is that with the RIT dye....it worked much better by completely eliminating the soda ash step

here are the dried and pressed pieces


This piece turned out beautifully......even without the soda ash...totally unexpected! click on it for a better look

You can see the nice mottled effects....scrunched and sitting in the bag, some of the fabric is exposed to a more concentrated pool of dye, so you get darker and lighter spots happening..the more "creases" the better the effect..the less you squish initially, the more whites you will have showing....if you wanted a more solid colour you would want to go and squish it a bit every so often in the early stages to cause a more even distribution of the dye.


This is really a super basic method....if you want to delve more into the dye process, and purchase all the recommended supplies and chemicals....go for it...there are a great many books on the subject and of course, workshops, classes, including online classes as well. BUT if you just wanted to try dyeing with just a few basic supplies, without all the up front investment...this is an easy, inexpensive way to give it a go....and as I discovered with this experiment...using the Rit dye, means you don't even have to get the Soda ash.

Perhaps you may try your own experiments.....But please....Do be mindful of safety!...use the mask, protect your skin with rubber gloves (unless you like multi-coloured hands)...protect your work area and your clothing.

Note: I did eventually stop "bleeding" on the problematic pieces....a final soak using a cap full of Retayne  did the trick.  


Monday, October 28, 2013

A "Blog-versary" and Hand Dyed Threads

I can hardly believe it... I began this blog 5 years ago.....well, actually....5 years plus a week ( kinda let the "blog-versary" slip by)

In my very first post I said:  "Blogging is a new concept for me. I have absolutely no clue as to what I am doing just yet but I have never let that stop me before. I have found many blogs to be intriguing and inspiring. What will I bring to this forum?....I do not know. I will just have to see where this leads."

Over the past 5 years, I have stitched, stamped, carved, drawn, painted, stenciled, beaded, dyed, printed, discharged, inked, doodled, designed, batiked and papercut, in addition to cotton and wool, I have used leaves, rocks, dryer sheets, paper, metal and other "found" objects. It has been 5 years of experimentation and exploration, I am loving playing with everything I can get my hands on.

This past weekend, I spent time dyeing threads, I decided to see what results could be obtained using just 3 colours of dye.


After creating several skeins with plain, off-white mercerized cotton.....about 15 yards in each, I soaked them in a soda ash solution, then, mixed up a yellow, an orange and a cherry red dye.


I saturated the cotton with dye in a variety of ways, each giving different effects.....I think my favourites came from applying dye to specific areas using an eye dropper. Here is a closer look at a few of them


Friday, November 9, 2012

Anne-Marie's Prize

Recently, I celebrated my 3 year Blog-Versary by having a giveaway...the prize was to be an original doodle by me...........the winner was Anne-Marie (no blog). She asked me to draw a frog, I did, and sent it off to her. I had not shown it yet, because I wanted her to be the first to see it. Yesterday she let me know it arrived, so here is a look at her very own frog.
So glad she liked this.....She sent me an email and I just had to share part of it with you....Anne Marie says
"This is one froggin' awesome doodle! I love everything about it: from the pattern on the back to the funky legs and the sharp eye! It looks like it's about to jump out of the frame!"


Saturday, October 20, 2012

Blog-versary.......3 years and counting

I became a blogger 3 years ago. Like many of you, my blog is really just a place to track my progress, to be able to look back and see the evolution of my work. In the beginning, I did not even know how to upload a photo. It has been a terrific learning experience and along the way, I have met some fabulous people and have been presented with several exciting opportunities. I enjoy having this spot to share my "eureka" moments and am always delighted by your comments.

I know some of you have found me just recently, while others have been visiting right from the very start.

I think 3 years, needs to be celebrated, don't you?........perhaps a giveaway is in order?......the prize????.....well my doodles seem to be popular so how about if I offer to do one just for the winner?
To enter, leave me a comment telling me what you like best about visiting my little corner of the Net.

I'll choose the winner next weekend........if you win,
what would you have me draw????


Thursday, October 20, 2011

Blog-versary

I can hardly believe that I started this blog 3 years ago. Yup, it was 3 years ago today that I put up my very first post..........and it said:
"Blogging is a new concept for me. I have absolutely no clue as to what I am doing just yet, but I have never let that stop me before. I have found many blogs to be intriguing and inspiring. What will I bring to this forum?...................I do not know. I will just have to see where this leads."

In the beginning I didn't even know how to upload a photo and creating links was a complete mystery. I have met some fabulous people through this medium, been given some wonderful opportunities and have enjoyed having this place to chronicle my journey as I grow into the artist I want to be and most of all, to be able to share ideas.

What is a blog post without an interesting photo? You'll have to wait until next week to learn more about this one.

In the mean time don't forget to enter the giveaw
ay I am hosting, read my previous post to find out how to be entered into the drawing for the digital scrapbooking software, My Memories Suite
(Comments/Entries must be made in that post, thanks )


Copyright Jill Buckley