Showing posts with label stash busting. Show all posts

Wednesday, March 13, 2019

Another Stash Busting Project

Okay, first of all let me clarify......it was someone else's stash...and I had help (thank you Susan). A few years back, a good friend showed me some wool fabric she was planning to rid herself of. She had been a rug hooker for many years but had pretty much given up that hobby for several others, so of course, I could not resist these beautiful hand dyed wools and said that perhaps I could do something with it. Well...guess what...it came to my house only to sit on a shelf until I finally decided I had to use it or move it on.
The challenge was that because it was a rug hookers stash, it was not "yardage", it was pieces/strips. But it was beautiful quality in a gloriously rich, wide, range of colours. I decided to make a wool throw.....something just right for draping over oneself while knitting, watching TV, reading or maybe even a little lazy afternoon snooze.

This is where Susan came in, I had way too much and needed help using this stuff up. We split the stash...I took predominantly blues and greens...Susan, reds and oranges. We also used some thrift shop finds to supplement....a kilt, a man's suit and a few other pieces were disassembled and in some cases dyed to give us exactly the extras we needed. (for some reason I don't have any of the greens pictured here)  the pile on the right was the result of some dye experiments.


I created a conceptual diagram of the sort of thing we were trying to achieve and we were off.


The next step was to make sure everything was cleanly trimmed (the trimmed bits looked too pretty to toss away.)


and to sort the pieces by size....some were as much as 11" long, others closer to 4". then we just played laying them out to make workable rows.


We decided that we would sew them together in an unconventional way.....so that we would not be dealing with tons of seams, my reasoning for this was that I knew I wanted to do big stitch quilting at the end. I think Susan was more clever and took hers to a long-armer  ( I will explain shortly)


Once we each had a pleasing layout, the pieces were simply machine stitched by butting the raw edges up to each other and using a triple zig zag which was such a pleasant sewing process.  Long vertical rows were created, then each row was attached to the next in the same manner


While I stayed very much in a subdued colour scheme, Susan on the other hand, added some brilliant, unexpected pops of colour to hers.


Susan and I each used a thin batting and found some nice Robert Kaufman flannel for our backings


A piece of soap served to mark the concentric circles which I would hand stitch using 12wt Aurifil cotton. The flannel for the back was only 45" wide....it needed to be pieced to get the required width, Susan pieced hers entirely with the flannel


...I chose to add a row of the same wool pieces used on the front to create my pieced back


These throws finished at 60" x 50" and are super cosy


the texture added by the machine quilting is fabulous!


I used striped cotton leftovers from the backing of a previous quilt for my binding.....Susan pieced wool to create her binding


I LOVE that Susan kept the labels in place from one of the up-cycled clothing pieces


Now.......time ( and use ) will tell if not having sewn traditional seams will have been a poor decision.....I must admit that I am a little concerned about how much stress the joins will endure over time. I think Susan was wise to have her quilt machine quilted as I think that will help its sturdiness and durability.

But, I have been using mine every evening for several weeks and it is not showing signs of any problems yet....."yet" being a key word.  I may go back and add more stitching to mine just the same.

oh....and btw......we were not completely successful at "stashbusting"  LOL! 


Monday, February 26, 2018

Finished

This quilt was made with the intention of  "busting my stash". It is finished, but my stash is only slightly dented. I find it interesting to see how the wonderfully all the fabrics work together as this quilt is made up entirely from a wide variety of fat quarters I had accumulated over the years....the exception being the duvet cover I used as backing and that neutral grey I purchased for the sashing/binding
you can find the earlier posts about this project here.


I made pillow shams to carry out the same look of the quilt. The backs are primarily made up of the last bits of scrap from the duvet.


Like the quilt, I did "big stitch" hand quilting using Aurifil's 12 wt  variegated cotton, these lovely threads were also part of my stash.


I cut a gentle curve at the edge of this 106" x 90" quilt, so there is a lot of  hand stitched bias binding.


Not sure why this one took so long, (might have something to do with hand stitching through layers of batiks and fusing) but for the most part, I suppose it kind of got forgotten and left on the back burner for a while, but it is finally finished .......hmmmm......but....there is still more stash waiting to be used.  :-)


Wednesday, December 20, 2017

Going in Circles......Stash Busting

Does this happen to you?.....sometimes you see something and you just gotta try it for yourself?.... that is how this all started. One day I saw an image of a floor mat made by wrapping fabric strips around rope and stitching....and you know I felt compelled to give it a go.

I started with the strips.....lots of them, including selvages. The basic method is simple, wrap the fabric strips around the rope, begin by creating a small coil, as you build the circle, a zig zag stitch binds the rounds together. It is the same basic process as making a rope "bowl" and there are plenty of tutorials to be found online. The big difference is that when making a floor mat you need to make sure that the whole thing is being supported on a flat surface. The bigger you want to make the mat....the trickier this can become.


To set up, I placed my machine on an old wash stand that got the bed of my machine matching the height of my work table, in front of that (behind the machine) I built up an area that would be at the same height as the machine and the work table beside me. A combination of things were used, a sturdy cardboard box on top of a large plastic bin worked out just right so that I now had lots of support space


here it is finished, it is 48" across


But wait.....there's more! I quite enjoyed making this and decided to try a different approach. Instead of one large circle, I began making lots and lots of smaller circles in a variety of sizes.


butting them up against each other and "joining" them with that same zig zag stitch
In order to keep everything together in the design pattern I had worked out on the floor, I pinned them together by inserting pins in opposite directions.

and joined them
The process does require a bit of planning and some careful handling, but because the pieces are essentially "hinged" together, it is not that difficult to manipulate under the machine


I had a particular spot in mind for this project. The carpeting in front of the patio doors sees lots of traffic in nice weather but a regular area rug would not work because of the placement of the floor vent. By creating this one out of the circles, I could shape it to suit my needs.

Practical, kinda funky and a great way to bust that stash.  (who am I kidding.....gonna have to make many many more to put a dent in the stash.

Friday, July 14, 2017

A Little of This and a Little of That

What have I been up to?  well..............lets see
Got this gorgeous roving last week.......I am very aware that learning to spin on my drop spindle will take patience and practice, but I have been watching lots of tutorials on You Tube, I think I am just about ready to give it a try.
I am still hand stitching my big quilt (although I must admit it is not receiving as much attention these days) but I have made it all the way to the outer border. If you don't recall this stash busting quilt, you can see earlier posts here and here


What I have been doing, is spending lots of time drawing on my iPad. I especially enjoy being able to sit out on my deck while drawing....the breeze can't blow my drawings away.
I was recently asked to share my process for creating Mandalas (like the ones shown below) using my iPad mini2, Concepts and my new Bamboo Sketch stylus by Wacom


if you are interested in taking a look, you can find the online article here, even if you don't want to "read" the technical stuff, there is plenty of eye candy and some fun to watch, quick little video clips.
A special thank you to  Erica Christensen for her work on this piece (she makes me sound like I almost know what I am talking about)

Oh, I even used the app and stylus to remove and replace the original background of the bio photo, now it appears that I am standing in front of one of my Mandala quilts.  :-)


Monday, August 15, 2016

Backing, Batting and Stitch

This quilt has been a completed top for a number of months now.
The first obstacle to getting on with the process was my batting. You see, the quilt measures 106" x 92".....my roll of batting is only 63" wide.
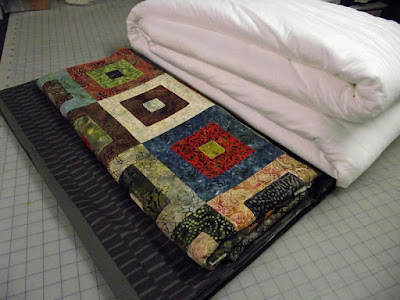
So I rolled out 2 twelve foot long pieces and carefully joined them together


for the backing, I used a duvet cover I found in a clearance bin ..... it washed and dried beautifully....so at $10, this 100% cotton duvet was "re-engineered" and turned into a perfect backing piece  ( in order to achieve the necessary size, I needed to deconstruct and incorporate the pillow sham as well)


here are the 3 layers ready to be combined.....trouble is, I do not have a large enough space anywhere in my home to fully lay this thing out. Luckily, I did have the opportunity to use a room in a church basement


Batting  (this piece is roughly 12' x 13')


the backing ......would you have guessed it was a transformed duvet and pillow sham?
once the layers were all assembled, trimmed and basted, I next wanted to create clean edges for the large amount of handling that will happen as I work on this project


This was done by turning the backing edge over, folded to the front to create a sort of wide "temporary" binding

rolled once
rolled twice
pinned and ready to long baste


Yeah, this does take a little extra time, BUT, it encases the batting and gives me a nice clean working edge......since I am hand quilting this thing I don't want to be constantly dealing with stuff sticking to the exposed batting and vice versa


here it is all ready for the stitching.......to the left of this set up I have a TV, DVD and Media box.....I can binge watch some shows as I stitch along

Since my goal in making this quilt was to try to use supplies I already had, I am stitching with the 12 wt variegated Aurifil thread I won a few years ago. It is perfect for doing this "Big Stitch" quilting.


An earlier post about this particular project can be found here


Copyright Jill Buckley