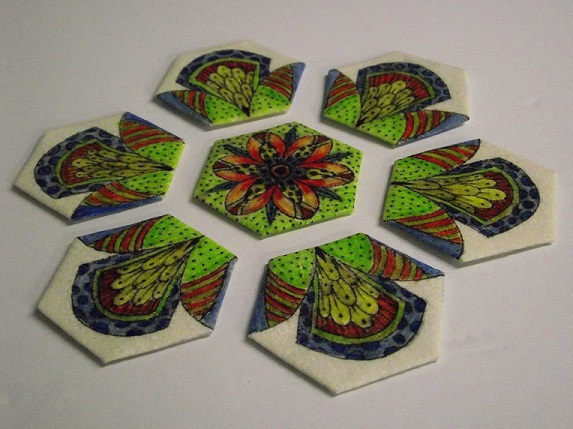
Friday, December 18, 2015

Doodled Hexagon Tutorial


For those of you who would like to try this technique, I plan to share a download-able, printable design for you to use soon.
But first I thought I would show the basic steps of the process.  Warning! this is a long post....but don't miss the ending...there is a money saving tip for those of you who are buying lots of pre-cut hexagons in packages

Note....Any time you will be drawing/ painting or inking fabric you always need to begin with one that has been pre-washed.

Supplies: 
White, off white or very pale coloured cotton
Freezer paper
Dry Iron
Frixion or other pen with disappearing ink
A light box or some other light source for tracing the design
Masking tape
Permanent marker .....needs to be waterproof for this process
Fabric paint (preferably transparent) or inks or Inktense pencils
Note....you need to test to make sure whatever you chose will not change the "hand" of your fabric as you don't want anything that will be prohibitive for the hand sewing process  (some paints/mediums leave the fabric with a plasticy feel which you most definitely do not want)
Aloe-Vera Gel   (the clear stuff....no colour)
Assorted paint brushes
Paper hexagon pieces  (I am using 1".....these measure 1" on each of the 6 sides)
A fabric glue pen or stick

Below, are the steps that will be done to each hexagon.

Step 1:  is to press freezer paper (shiny side down) to the wrong side of the fabric, the freezer paper will stay in place until each hexagon has been painted....it acts as a stabilizer for ease of drawing and painting on fabric

Step 2:  Add guidelines......using a Frixion pen ( or any disappearing marker) on the fabric's right side, trace around the outer edge of your hexagon


next add markings indicating roughly 1/4" seam allowance.


Trim close to the seam allowance


you are ready to begin drawing on the hexagon


Step 3:  Using a light-box.....trace the desired design using a permanent, waterproof pen ( I use an ultra fine tipped sharpie marker)  notice that I have used a little bit of masking tape to secure my hexagon in place to prevent slippage


Step 4:   time to add colour.....there are a variety of ways to colour/paint fabric.....for this one I used Seta-Color transparent paint and clear Aloe Vera Gel
I first spread a thin layer of Aloe-Vera gel over the marked design/doodle. The gel makes the application of paint easy without worry of bleeding, running or having to thin the paint first...(use the paint straight from the bottle)

Begin in the center and work outward......I place the hexagon on a small piece of card-stock so I can rotate my work easily without having to handle the hexagon any more than need be


With a paint brush, apply the paint into the still wet aloe vera gel. (the gel has lots of "open" time....meaning that is does not dry quickly)....meaning you don't have to rush
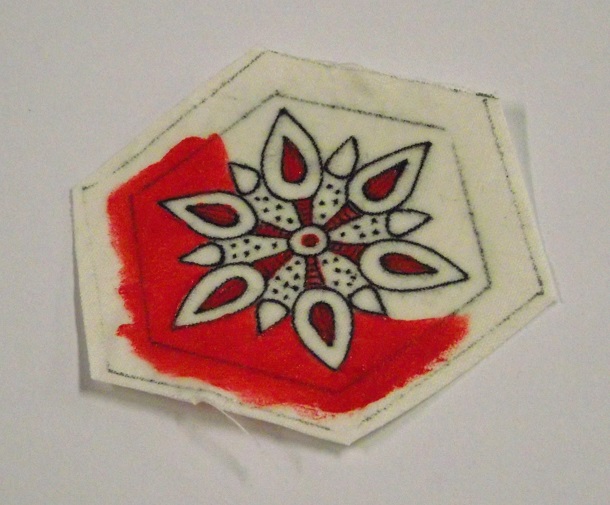

notice that I am brushing the paint over the fold lines. I want to make sure that I have good coverage.


Step 5:   Set aside to let dry completely
Step 6:  Now is the time to remove that freezer paper from the back of your work, place the hexagon face down and place (centering) a precut hexagon paper piece (use the light box if you are having trouble seeing the guidelines)


Step 7:  using a glue stick/pen lay a thin line of glue on the paper along the first edge you will turn Tip: keep it back from the very edge of the paper so that there will not be glue in the area you will later being stitching through   (For those of you who prefer the thread basting method.....well...you know what to do)

begin folding over each edge, one at a time, until the all edges of the hexagon have been folded to the wrong side
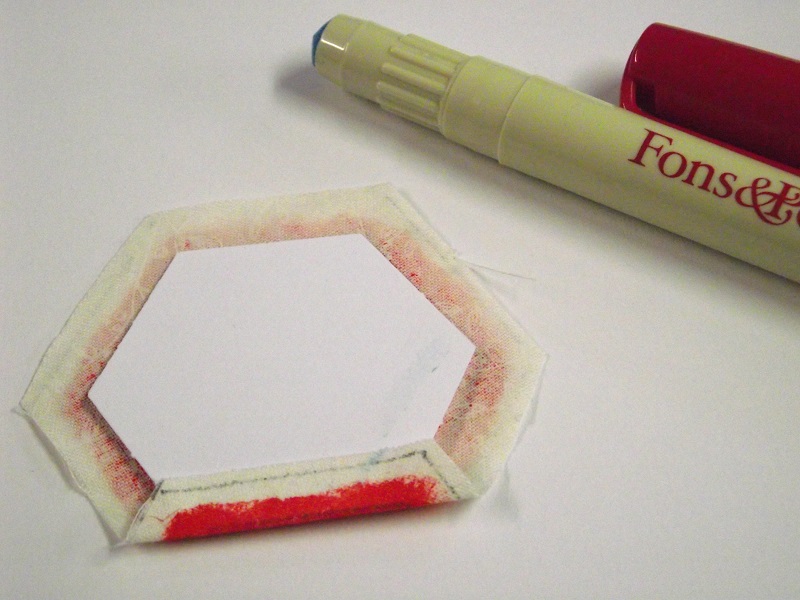


The fabric paint is permanent once heat set.....this is done using a hot,dry iron....at this point the hexagon is ready to be joined into a rosette.  using the same method, continue to prep, draw, paint, and baste the other hexies that will join in

I always test.....so to be certain that the method and supplies I chose to use will all be okay when subjected to water.....I did just that. I heat set this hexie, then simply stitched the hexie onto a piece of wool......which was then submersed it into a dish of water. (here it is underwater...the photo shows that there is no running, bleeding or lifting of colour)

once dry it came out soft pliable and with no loss of colour

I knew that if I want to able create many of these rosettes (like the one at the top of the post) I was going to be in need of lots of paper hexagons. I have purchased some pre-cut hexagons but holy cow...they run anywhere from $6 for 100 pieces to $7 for 50 pieces (depending on the brand) so I figured that had to be a better way


I found this Fiskar's "Squeeze" punch... it is simple to use, I can cut as many perfect hexagons as I like in just minutes.  1 sheet of card stock yields 20 pieces of the 1" size I am currently using. The cost of this cutter was regularly $30 but I had a 50% off coupon so I think it will pay for itself in no time.


just a note about products......for the single hexagon shown in this tutorial, Seta-colour transparent fabric paint was used....for last weeks rosette (shown at the top of the post), I used Jacquard textile paint, and for the one below, I used Inktense pencils...each "colour" product was used with the Aloe-Vera gel.....in the case of the Inktense pencils....I applied the pencil to the fabric first and then carefully painted the gel over top to "activate" the ink

Okay....so I think I have covered everything....but if you have any questions...leave a comment and I will do my best to answer them.....I will try to have a design ready for us to play with soon.


I am linking up to Nina-Maries Off the Wall Fridays where there is some fabulous inspiration being shared by many outstanding artists.....why not grab your favouite beverage, relax and check them out.

Thursday, December 10, 2015

More Doodled Hexagons

These could very well turn into a new obsession for me.  If you saw my last post, you know I had begun experimenting with doodling and painting hexagons to be used in English Paper Piecing.

I started another, larger rosette. Just one colour added this time. here is what some of the pieces look like before the edges were folded...not a very pretty sight!


ah...but here they are looking much better.


I began this rosette with a specific design planned (made up of a total of 19 hexagons) but suddenly realized that by moving and rotating the bits about, many other designs could be created with those same 19 hexagons....so I did just that to get a visual on the other possibilities before I thread my needle.


So,my rosette is ready to be stitched....but... you will have to wait for my next post to see which one I chose.

I plan to post a detailed tutorial of my process in the near future......if I provide a design....would you like to give it a try?


Friday, December 4, 2015

Doodled Hexagons

Recently, I have begun noticing these Millefliore and Passacaglia quilts popping up in the cyber world. They are amazingly beautiful and I am most intrigued.

Having never tried English paper piecing, I decided it was time to give it a try. I picked up a package of 1" hexie papers and set about making a rosette. (my very first one) so I kept it plain and simple to make sure I understood the technique)


Then a thought popped into my head........what would happen if I doodled on each hexagon before putting them together?
Now, of course, you KNOW I had to test that idea

I drew some "guidelines" on the fabric to make sure the drawing would end up in the right spot ( I used a Frixion pen for this as I will want them gone later)

Doodled with a permanent marker
Added colour
Ready to assemble

I made sure to brush the paint over the "fold" lines so I would not have any "blank" spots


Finished ....Doodled-Painted Hexagon Rosette

Not perfect, but certainly interesting results...... Something tells me I will be doing more of these!!!


I am linking up to Nina-Marie's  Off the Wall Fridays


Wednesday, November 18, 2015

Inspired to Doodle....in 3D

This past weekend, I caught a whimsical, Robot themed art exhibit that inspired me to try something a little different.
This local Artist, Eric Cator, had some fabulous pieces on display, but what most caught my eye, were his layered pen & ink drawings.  (links to just a few of his fantastic black and white "Robot" drawings here and here and here)

I decided to see if I could achieve that layered technique using my own drawing. Below, is my finished "test" piece, I learned a LOT by doing this....and what I learned..... was mostly what not to do   :-)


I drew various parts of  the scene on 4 different pieces of plain white 8.5" x 11" card-stock and carefully cut away backgrounds  (I laid them on black paper just so these would "show" up in the photos)


using strips of foam core, and double sided tape, I began "stacking" the layers


It was kinda tough to get a photograph that really shows the depth


now, I need to go purchase a shadowbox frame so I can try it again and make a proper one.


Friday, October 30, 2015

Fountain Pen Doodles

As any of my regular readers know, I seem to have a bit of an obsession with doodling. Up until now, they have all been created using permanent markers or pigment pens.......but wait!...there is a new kid on the block  (well, new to my studio) it is a fountain pen called the Ahab Flex by Noodlers.

I had always thought of fountain pens as simply writing instruments, never really considered drawing with them.  At the Toronto Creative Festival this fall, a vendor in attendance,Quills, had some inventory out that could be test driven. As soon as I made that first stroke, I knew that pen was coming home with me.

I filled it with ink and began playing with little doodles.....these are the first ones and as you can clearly see in this photo, I really am able to get some very fine, intricate lines with this pen, to give you an idea of scale.....the pen measures 5.25 inches


I LOVE this pen, I can't stop playing with it.   Yesterday, a Spider fell out!


In case you are intrigued......here are links for couple of online resources for the Ahab Flex Fountain pen.....I am totally new to Fountain pen use so am learning about ink properties, cleaning and so on....You Tube has lots of videos on the topic too.

The Goulet Pen Co
Noodlers Ink
Amazon

Sunday, October 25, 2015

Coming soon!!!!!

In my last post, I wrote about an opportunity that I had recently turned down because it just did not seem to be the right fit for me, today I want to SHOUT about an amazing opportunity that this time, was absolutely right!

Over the summer I was contacted by an acquisitions editor representing  Quarto Publishing, with the Walter Foster  group, I must admit that the email really caught me by surprise and I had to read it more than once.
As it turned out, while doing artist research, some of my doodles had caught this editor's attention and I was being contacted to see if I might have interest in collaborating with them on a book project.

Whoa!......you gotta know I sure was interested and couldn't wait to hear more!

She proceeded to fill me in on the concept of the book as well as what they had envisioned for my contribution.  It did not take long to determine that this project certainly did seem to be a perfect fit, and, as you might imagine, I was quite excited to accept the proposal and eagerly got to work creating projects for my section.......(although I really should not use the word “work” as I have been thoroughly enjoying the process)

The Art of Fashion Tangling: 40 prompts, patterns & projects for fashion-forward tangling artists &doodlers is to be 144 pages featuring several artists/authors, each one bringing to it, their own unique, fabulous style.........and I am completely thrilled to be counted among them.

You can read details about the book and its scheduled release date here
 

I snagged this image from the web site.....I LOVE the cover art they chose to go with!

Below you will find links to the web sites of each of the book's contributing artists, you may already be familiar with many of them, ..... just click their names to explore their work. 

Jill Buckley........... you are here :-)


I can hardly wait to see it all come together......so SO excited!!!!


Sunday, October 18, 2015

Passing on an Opportunity

Many of my readers have suggested that I should create a "colouring" book with the doodles that I draw......well......back in April, I was contacted by a publishing company with an interest in doing just that............ I was SO incredibly excited! 

After several months of discussions, proposals, and sample drawings, I was indeed offered a contract.

Unfortunately, in the end, I really did not feel that the project was quite right for me and decided to turn it down......believe me when I say, it was a tough, VERY tough decision.

There were many deciding factors, but partly I suppose, it was that my drawings were not really looking like "my" drawings anymore. I can explain it better visually with the example drawings below

This 1st one is okay.....but not all that interesting


The 2nd one is likely how the drawing might look when prepared for use in a colouring book, definitely more detail.....a little more interesting....but... still not quite "me"

This last one definitely feels more my style, I like to add a little drama by playing with positive and negative, but all those filled in areas, all that black, would make it unsuitable for a colouring book.
In order for me to feel comfortable with this project, to move forward, to accept the contract, to dedicate the massive amount of  hours the work would require, I had to LOVE what I was doing and that just wasn't the case.

BUT.....other opportunities can come along....and recently, another one did.....one that absolutely DID feel right....I will tell you more about it in my next post.


Monday, October 12, 2015

Doodle Inspiration

This weekend, our area is enjoying some glorious autumn days.......the weather could not be more perfect. On Saturday, while doing yard work I came across this interesting bug.


Turns out, it is a Helmeted Squash Bug.....and look how wonderfully Mother Nature doodled him.
so I was, of course, inspired to do a little doodling myself.


In progress


Copyright Jill Buckley