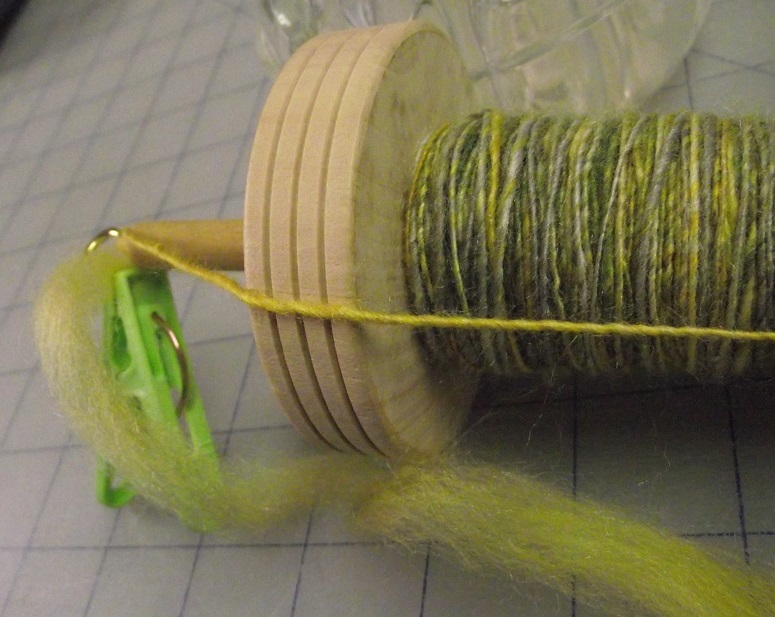
This past summer I spent some time learning to "spin". Not only did I want to spin my own yarn, but I also wanted to make my own spindles. I stuck with the k.i.s.s principle and kept it simple.
What I did not already have on hand only took a trip to the hardware store, where I was able to pick up some wooden wheels, beads and dowels.
Now, they don't need to be pretty to function.....but heck, why not make them nice to look at too! I decided to try colouring them, wanting the beauty of the wood grain show through, but not wanting to go buy several cans of wood stain (would have been expensive and wasteful) I found that my transparent textile paint worked just fine. I used Seta-Colour transparent paints thinned with water.
Once the parts were dry, the spindles were assembled and a couple of coats of varnish were applied. I pre drilled a tiny hole to make it easy to screw the cup hook in the center of the dowel. In order to get a nice tapered end, I just used a pencil sharpener. Told ya I kept it simple.
Not only do my spindles work great, they are a little less boring to look at now.
I find it interesting that a few bits of wood and a cup hook can transform a pretty pile of fluffy fibres (this is a Merino and Tencel 50/50 mixture) to a beautiful finished yarn ready for my needles.
Sunday, January 28, 2018
Wednesday, January 10, 2018
Book Review - Sewing Knits from Fit to Finish
If you sew at all, you have likely made a garment or two, if not for yourself, perhaps for your children or grandchildren.....and if you have sewn garments of any sort, you realize rather quickly that there is a lot to learn about fabrics, threads, handling, finishing techniques, patterns, fitting and more.
Garments made using knits are especially nice to wear, more and more of them are finding their way into our closets and drawers. Sewing with knits presents it own set of challenges, but being armed with the right information can take the apprehension out of buying and working with them.
That's where this book comes in. I received a copy to review and was immediately impressed with lovely presentation and wide range of topics within.
Garments made using knits are especially nice to wear, more and more of them are finding their way into our closets and drawers. Sewing with knits presents it own set of challenges, but being armed with the right information can take the apprehension out of buying and working with them.
That's where this book comes in. I received a copy to review and was immediately impressed with lovely presentation and wide range of topics within.
Sewing Knits from Fit to Finish
Proven Methods for Conventional Machine and Serger
Author. Linda Lee
Anyone wanting to sew garments using knit fabrics will find this book to be an excellent resource.
The subject matter covered in this book is extensive and impressive
In
addition to the expected construction techniques, (which are terrific)
you are given in depth information about the different types knits
available, providing guidance on how to identify which knits work best
for the type of garment you intend to sew. Covering the individual characteristics and properties of each, their fibre makeup and what you
might expect when working with them such as ease or difficulty of
handling, and what of the “hand”?, is it soft, drapable, fluid or firm
and stable, will the knit unravel easily or have edges that curl? and
how to determine the amount of stretch your selected knit fabric has.
With
so many choices, shopping for knit fabrics can be a bit confusing, this
book takes the guesswork out of making a fabric selection that will
best suit the garment you wish to make. There is even a chart giving you
the estimated yardage required by garment type and fit.
| Contents Page |
Sections
on fit, basic pattern adjustments and understanding ease are all
extremely helpful. Provided in the book, is a measurement chart not only
telling you what measurements you will need, but also good descriptive
and visual information to help ensure these measurements are taken as
accurately as possible.
You
will be guided through the sewing process with options for using a
conventional sewing machine, serger and or cover-stitch. In addition to
the topics touched on above, sections covering fabric preparation,
interfacing, pressing, marking, needles and thread choice all come
together to put you on the path to success in creating your garment.
In
addition to clear, detailed instructions accompanied by wonderful
photographs, you will find helpful tips scattered throughout the book. So if you are thinking this is the year you plan to make some flowing summer dresses, a few tees, or something a bit more challenging and want to know more about working with knits, I think this is a great reference guide.
Find the book and more reviews here on Amazon and Quarto Knows or head on over to the author's web site The Sewing Workshop for patterns, tutorials and more.
Monday, January 1, 2018
Drawing Daily
Sometimes, it seems so difficult to settle on what to draw that I end up drawing nothing at all. I have done prompts in the past, but I don't think I have ever done a "series". I do enjoy working in the mandala form so December saw me designing/drawing snowflakes, one snowflake each day.
Drawing this way (in a series) meant that even when the stylus was not in my hand I was thinking about what I wanted to design next, an excellent way to keep the creativity flowing. These were all drawn on my iPadmini2 using Concepts.
Thank you to Singing Bell for allowing me the use of their music for this video.
Drawing this way (in a series) meant that even when the stylus was not in my hand I was thinking about what I wanted to design next, an excellent way to keep the creativity flowing. These were all drawn on my iPadmini2 using Concepts.
Thank you to Singing Bell for allowing me the use of their music for this video.
Labels:
Concepts app,
digital drawing,
iPad doodles,
Singing Bell,
snowflakes,
Video
Wednesday, December 20, 2017
Going in Circles......Stash Busting
Does this happen to you?.....sometimes you see something and you just gotta try it for yourself?.... that is how this all started. One day I saw an image of a floor mat made by wrapping fabric strips around rope and stitching....and you know I felt compelled to give it a go.
I started with the strips.....lots of them, including selvages. The basic method is simple, wrap the fabric strips around the rope, begin by creating a small coil, as you build the circle, a zig zag stitch binds the rounds together. It is the same basic process as making a rope "bowl" and there are plenty of tutorials to be found online. The big difference is that when making a floor mat you need to make sure that the whole thing is being supported on a flat surface. The bigger you want to make the mat....the trickier this can become.
To set up, I placed my machine on an old wash stand that got the bed of my machine matching the height of my work table, in front of that (behind the machine) I built up an area that would be at the same height as the machine and the work table beside me. A combination of things were used, a sturdy cardboard box on top of a large plastic bin worked out just right so that I now had lots of support space
here it is finished, it is 48" across
But wait.....there's more! I quite enjoyed making this and decided to try a different approach. Instead of one large circle, I began making lots and lots of smaller circles in a variety of sizes.
butting them up against each other and "joining" them with that same zig zag stitch
In order to keep everything together in the design pattern I had worked out on the floor, I pinned them together by inserting pins in opposite directions.
The process does require a bit of planning and some careful handling,
but because the pieces are essentially "hinged" together, it is not that
difficult to manipulate under the machine
I had a particular spot in mind for this project. The carpeting in front of the patio doors sees lots of traffic in nice weather but a regular area rug would not work because of the placement of the floor vent. By creating this one out of the circles, I could shape it to suit my needs.
Practical, kinda funky and a great way to bust that stash. (who am I kidding.....gonna have to make many many more to put a dent in the stash.
I started with the strips.....lots of them, including selvages. The basic method is simple, wrap the fabric strips around the rope, begin by creating a small coil, as you build the circle, a zig zag stitch binds the rounds together. It is the same basic process as making a rope "bowl" and there are plenty of tutorials to be found online. The big difference is that when making a floor mat you need to make sure that the whole thing is being supported on a flat surface. The bigger you want to make the mat....the trickier this can become.
To set up, I placed my machine on an old wash stand that got the bed of my machine matching the height of my work table, in front of that (behind the machine) I built up an area that would be at the same height as the machine and the work table beside me. A combination of things were used, a sturdy cardboard box on top of a large plastic bin worked out just right so that I now had lots of support space
here it is finished, it is 48" across
But wait.....there's more! I quite enjoyed making this and decided to try a different approach. Instead of one large circle, I began making lots and lots of smaller circles in a variety of sizes.
butting them up against each other and "joining" them with that same zig zag stitch
In order to keep everything together in the design pattern I had worked out on the floor, I pinned them together by inserting pins in opposite directions.
| and joined them |
I had a particular spot in mind for this project. The carpeting in front of the patio doors sees lots of traffic in nice weather but a regular area rug would not work because of the placement of the floor vent. By creating this one out of the circles, I could shape it to suit my needs.
Practical, kinda funky and a great way to bust that stash. (who am I kidding.....gonna have to make many many more to put a dent in the stash.
Friday, November 17, 2017
Another Trish Burr Transformation.
I have been unbelievably fortunate to have had several opportunities to design for embroidery artist, designer, author and instructor, Trish Burr. Each and every time she works her incredible magic with needle and thread to transform the doodle I send her into a spectacular piece of art.
Last year (right around this time) Trish contacted me with a Partridge design in mind. After a bit of consultation, I got to work. This design was drawn on my iPad mini 2, using a brilliant app called Concepts. The beauty of drawing this way is that I can make requested changes quickly and easily.
Recently I have noticed images popping up on social media sites that told me the design is now "out" there.
It can be found in the latest issue of Inspirations magazine
As you can see, Trish tweaks the design I send her to make it more stitch friendly.....she removes and adds elements, then begins the process of creating the actual stitching and writing the pattern instructions. It is quite the process from idea to published product and I am ALWAYS astounded to see that final result!
you can see and read about some of my other designs transformed by Trish here
Last year (right around this time) Trish contacted me with a Partridge design in mind. After a bit of consultation, I got to work. This design was drawn on my iPad mini 2, using a brilliant app called Concepts. The beauty of drawing this way is that I can make requested changes quickly and easily.
Recently I have noticed images popping up on social media sites that told me the design is now "out" there.
It can be found in the latest issue of Inspirations magazine
As you can see, Trish tweaks the design I send her to make it more stitch friendly.....she removes and adds elements, then begins the process of creating the actual stitching and writing the pattern instructions. It is quite the process from idea to published product and I am ALWAYS astounded to see that final result!
you can see and read about some of my other designs transformed by Trish here
Labels:
Concepts app,
Doodles,
doodles to embroidery,
iPad doodles,
Trish Burr
Friday, September 22, 2017
Its Official
Even though the forecast here today is for the temps to reach 31 degrees Celsius (87.8 F), summer is officially over and Autumn has begun.
Time to gather your nuts!
Tuesday, August 22, 2017
Fluffy Fibre......to Knitted Stitches
I am still working out how to spin on my DIY drop spindle.
I began with that 3.5 oz braid of dyed roving that I purchased from a local vendor....after reading tutorials and watching youtube videos, I gave it a shot.....I showed my first "test" subject in an earlier post (here), today I thought I share the process from start to finish.
In order to create plied yarn, I would need 2 balls/bobbins/skiens of spun roving. I broke off 2 equal (roughly) sized amounts of roving and began spinning......once I finished each chunk (my spindle was reasonably full) I would need to take it off, keep the 2 separate....then find a way to ply (twist) them together to make my yarn.
So I decided to make myself what is referred to as a Lazy Kate (or maybe just a "Kate"?)
I happened to have these vintage bobbins on hand (they were simply decorative with my sewing collectibles) once emptied, they would be perfect.
I gathered some supplies.....a sturdy box (gift box from the dollar store) a few knitting needles from my stash of many many duplicate needles (knitters out there know about that LOL!) and some binder clips
I wound the "singles" off the spindle onto each bobbin
I attached binder clips to an extra knitting needle as guides to keep the fibre from getting all tangled
The spun fibre glided off the bobbins quite smoothly as I plied them together (back onto the spindle.)
Once the yarn was "plied" the next step would be to "set the twist" and to do this I would need something I could wind the yarn onto that would keep some tension and allow me to immerse it all in a warm bath......so I needed to make what is called a "Niddy Noddy"
I went to the hardware store and purchased some PVC pipe 1/2".....2 T connectors and 4 end caps.
note: the grey PVC is found in the electrical dept and is almost half the price of the white PVC found in the plumbing dept)
Because the yarn will wrap around 4 times for each pass.....my center pipe measurement at 12" will give me a 4' long skein. The bonus is that this can be taken apart, laid flat and if I wish, I can create different lengths of skeins by changing the center pipe length
The image below shows the yarn wound on the niddy noddy, along with the resulting skein of plied yarn.
Next I wanted to see if I could set the twist on a single ply. I am so pleased with how it turned out!
how amazing to be able to take fluff
and turn it into yarn with some pretty basic tools, this is a swatch I knit with my single ply yarn, to give you an idea...it was knit on size US 0 needles
This is a slow process, but it is so gratifying. I have found it so relaxing...and when I spin, I seem to loose track of time.
I have to tell you a story.....when I purchased this roving at a local craft/art show, I had asked the vendor how much yarn I should expect to yield from this particular braid. Her answer was that it depended on how thick or thin I would spin it. (okay that makes complete sense) so I replied as an example DK weight??? Well...a customer standing at the same booth, rolled her eyes and basically made a pffffftttt sound....turned to me and said (insert condescending tone)...."oh...if you are just learning to use a drop spindle you WON'T be spinning anything THAT thin!" uh .....yeah.... thanks for the encouragement.....perhaps she was trying to be helpful.....but her tone and body language said otherwise.
So as you know, I do LOVE a challenge......don't ever tell me what I can NOT do! But that is me.....someone else might have been so discouraged by that remark that they may have not tried at all and miss out on the of joy this art.
I began with that 3.5 oz braid of dyed roving that I purchased from a local vendor....after reading tutorials and watching youtube videos, I gave it a shot.....I showed my first "test" subject in an earlier post (here), today I thought I share the process from start to finish.
In order to create plied yarn, I would need 2 balls/bobbins/skiens of spun roving. I broke off 2 equal (roughly) sized amounts of roving and began spinning......once I finished each chunk (my spindle was reasonably full) I would need to take it off, keep the 2 separate....then find a way to ply (twist) them together to make my yarn.
| spun single in progress. |
So I decided to make myself what is referred to as a Lazy Kate (or maybe just a "Kate"?)
I happened to have these vintage bobbins on hand (they were simply decorative with my sewing collectibles) once emptied, they would be perfect.
I gathered some supplies.....a sturdy box (gift box from the dollar store) a few knitting needles from my stash of many many duplicate needles (knitters out there know about that LOL!) and some binder clips
I wound the "singles" off the spindle onto each bobbin
I attached binder clips to an extra knitting needle as guides to keep the fibre from getting all tangled
The spun fibre glided off the bobbins quite smoothly as I plied them together (back onto the spindle.)
Once the yarn was "plied" the next step would be to "set the twist" and to do this I would need something I could wind the yarn onto that would keep some tension and allow me to immerse it all in a warm bath......so I needed to make what is called a "Niddy Noddy"
I went to the hardware store and purchased some PVC pipe 1/2".....2 T connectors and 4 end caps.
note: the grey PVC is found in the electrical dept and is almost half the price of the white PVC found in the plumbing dept)
Because the yarn will wrap around 4 times for each pass.....my center pipe measurement at 12" will give me a 4' long skein. The bonus is that this can be taken apart, laid flat and if I wish, I can create different lengths of skeins by changing the center pipe length
The image below shows the yarn wound on the niddy noddy, along with the resulting skein of plied yarn.
Next I wanted to see if I could set the twist on a single ply. I am so pleased with how it turned out!
how amazing to be able to take fluff
and turn it into yarn with some pretty basic tools, this is a swatch I knit with my single ply yarn, to give you an idea...it was knit on size US 0 needles
This is a slow process, but it is so gratifying. I have found it so relaxing...and when I spin, I seem to loose track of time.
I have to tell you a story.....when I purchased this roving at a local craft/art show, I had asked the vendor how much yarn I should expect to yield from this particular braid. Her answer was that it depended on how thick or thin I would spin it. (okay that makes complete sense) so I replied as an example DK weight??? Well...a customer standing at the same booth, rolled her eyes and basically made a pffffftttt sound....turned to me and said (insert condescending tone)...."oh...if you are just learning to use a drop spindle you WON'T be spinning anything THAT thin!" uh .....yeah.... thanks for the encouragement.....perhaps she was trying to be helpful.....but her tone and body language said otherwise.
So as you know, I do LOVE a challenge......don't ever tell me what I can NOT do! But that is me.....someone else might have been so discouraged by that remark that they may have not tried at all and miss out on the of joy this art.
Labels:
drop spindle,
Knitting,
Lazy Kate,
Niddy Noddy,
roving,
spinning
Tuesday, August 1, 2017
More Digital Design
Lately, I find that I am spending quite a lot of time drawing on my iPad.....probably more than I would with pencil and paper. I think the reason being that drawing digitally lets you "undo" & "redo" as much as you like. Those who know me, know I tend to fuss with detail. Another fabulous feature of drawing digitally is that you can copy and paste elements you have drawn. (so efficient!) This mandala, inspired by the little birds socializing among the roses is a perfect example.
The photo below illustrates how I went from drawing a small wedge of my design, then by duplicating and rotating that chunk, I was easily able to create a complete circle. It is so interesting to watch the full image develop as you work through that process.
Of course, once that was done, I added more detail.....more....more...more
I drew it using dark ink lines (well....ya know....digital ink)
then, just for the fun of it, I changed the ink to white to see how the drawing might look that way.
This was all achieved on my iPad mini2, Concepts app and my Bamboo Sketch
As I look back at several of my art quilts and those fun paper cut snowflakes, I realize that I do seem to be quite drawn to the mandala form (no pun intended)
The photo below illustrates how I went from drawing a small wedge of my design, then by duplicating and rotating that chunk, I was easily able to create a complete circle. It is so interesting to watch the full image develop as you work through that process.
I drew it using dark ink lines (well....ya know....digital ink)
This was all achieved on my iPad mini2, Concepts app and my Bamboo Sketch
As I look back at several of my art quilts and those fun paper cut snowflakes, I realize that I do seem to be quite drawn to the mandala form (no pun intended)
Labels:
Bamboo Sketch,
Concepts app,
digital drawing,
Doodles,
mandalas
Sunday, July 23, 2017
Learning to Spin
I seem to have this thing about trying new (to me) ways of playing with fibre and have wanted to try my hand at spinning for some time now. This past winter, I created my own DIY drop spindle that would allow me to "ply" reclaimed yarns and so was able to get a feel for working with it, but still had not actually tried to spin my own yarn.
When I saw this particular batch of dyed roving, I knew the time was right to take up the challenge. As I mentioned in my previous post, I spent a lot of time watching a variety of You Tube videos and reading many tutorials before diving in. I did not expect to be perfect first time out of the gate. I am aware that the nature of hand spinning on a drop spindle means there will always be some inconsistencies, but I think that is also what makes it so intriguing.
I am taking it slow, methodically pre-drafting the roving, getting a feel for how to manipulate those delicate fibres. At this stage, I am using what is known as the "Park and Draft" method
I am trying to spin a fairly fine strand......but at the same time, something I can keep as consistent as possible.
I spun the roving clockwise and once I had enough built up on the spindle to try the next step in the process, I split what I had into 2 little balls and set about to ply them together.
and plied counter-clockwise (to take the photo, I "parked" the spindle in a glass flower frog) and to keep the little balls from tangling together, I placed each of them in their own glass jar.
I do not have special tools for any of this, so I set the twist by wrapping the yarn around a flexible thin sheet of plastic ( it was originally the cover from a document folder ) and placed it to soak in warm water for a few minutes. Once the excess water was squeezed out, the little hank was hung and left to dry.
It may not be perfect.....but I am thrilled with the result of my first spin experiment.
Because I am learning as I go, I decided to work through all of the steps of the process on a small scale, so that I now feel I have basic understanding of the mechanics involved and am ready to try spinning a full skein.
Even though I don't have fancy tools, I believe using a quality roving makes a huge difference. This particular roving is 70% Merino wool 30% Silk and was purchased locally from Debbie Jamieson Owner/Dyer of The Loving Path Fibre Arts, you can find her on Etsy and Facebook
When I saw this particular batch of dyed roving, I knew the time was right to take up the challenge. As I mentioned in my previous post, I spent a lot of time watching a variety of You Tube videos and reading many tutorials before diving in. I did not expect to be perfect first time out of the gate. I am aware that the nature of hand spinning on a drop spindle means there will always be some inconsistencies, but I think that is also what makes it so intriguing.
I am taking it slow, methodically pre-drafting the roving, getting a feel for how to manipulate those delicate fibres. At this stage, I am using what is known as the "Park and Draft" method
I am trying to spin a fairly fine strand......but at the same time, something I can keep as consistent as possible.
I spun the roving clockwise and once I had enough built up on the spindle to try the next step in the process, I split what I had into 2 little balls and set about to ply them together.
and plied counter-clockwise (to take the photo, I "parked" the spindle in a glass flower frog) and to keep the little balls from tangling together, I placed each of them in their own glass jar.
I do not have special tools for any of this, so I set the twist by wrapping the yarn around a flexible thin sheet of plastic ( it was originally the cover from a document folder ) and placed it to soak in warm water for a few minutes. Once the excess water was squeezed out, the little hank was hung and left to dry.
It may not be perfect.....but I am thrilled with the result of my first spin experiment.
| To give an idea of the size or "weight" of this yarn....I am getting 14 wraps per inch. |
Even though I don't have fancy tools, I believe using a quality roving makes a huge difference. This particular roving is 70% Merino wool 30% Silk and was purchased locally from Debbie Jamieson Owner/Dyer of The Loving Path Fibre Arts, you can find her on Etsy and Facebook
Friday, July 14, 2017
A Little of This and a Little of That
What have I been up to? well..............lets see
Got this gorgeous roving last week.......I am very aware that learning to spin on my drop spindle will take patience and practice, but I have been watching lots of tutorials on You Tube, I think I am just about ready to give it a try.
I am still hand stitching my big quilt (although I must admit it is not receiving as much attention these days) but I have made it all the way to the outer border. If you don't recall this stash busting quilt, you can see earlier posts here and here
What I have been doing, is spending lots of time drawing on my iPad. I especially enjoy being able to sit out on my deck while drawing....the breeze can't blow my drawings away.
I was recently asked to share my process for creating Mandalas (like the ones shown below) using my iPad mini2, Concepts and my new Bamboo Sketch stylus by Wacom
if you are interested in taking a look, you can find the online article here, even if you don't want to "read" the technical stuff, there is plenty of eye candy and some fun to watch, quick little video clips.
A special thank you to Erica Christensen for her work on this piece (she makes me sound like I almost know what I am talking about)
Oh, I even used the app and stylus to remove and replace the original background of the bio photo, now it appears that I am standing in front of one of my Mandala quilts. :-)
Got this gorgeous roving last week.......I am very aware that learning to spin on my drop spindle will take patience and practice, but I have been watching lots of tutorials on You Tube, I think I am just about ready to give it a try.
I am still hand stitching my big quilt (although I must admit it is not receiving as much attention these days) but I have made it all the way to the outer border. If you don't recall this stash busting quilt, you can see earlier posts here and here
What I have been doing, is spending lots of time drawing on my iPad. I especially enjoy being able to sit out on my deck while drawing....the breeze can't blow my drawings away.
I was recently asked to share my process for creating Mandalas (like the ones shown below) using my iPad mini2, Concepts and my new Bamboo Sketch stylus by Wacom
if you are interested in taking a look, you can find the online article here, even if you don't want to "read" the technical stuff, there is plenty of eye candy and some fun to watch, quick little video clips.
A special thank you to Erica Christensen for her work on this piece (she makes me sound like I almost know what I am talking about)
Oh, I even used the app and stylus to remove and replace the original background of the bio photo, now it appears that I am standing in front of one of my Mandala quilts. :-)
Subscribe to:
Posts (Atom)
Copyright Jill Buckley