

For those of you who would like to try this technique, I plan to share a download-able, printable design for you to use soon.
But first I thought I would show the basic steps of the process. Warning! this is a long post....but don't miss the ending...there is a money saving tip for those of you who are buying lots of pre-cut hexagons in packages
Note....Any time you will be drawing/ painting or inking fabric you always need to begin with one that has been pre-washed.
Supplies:
White, off white or very pale coloured cotton
Freezer paper
Dry Iron
Frixion or other pen with disappearing ink
A light box or some other light source for tracing the design
Masking tape
Permanent marker .....needs to be waterproof for this process
Fabric paint (preferably transparent) or inks or Inktense pencils
Note....you need to test to make sure whatever you chose will not change the "hand" of your fabric as you don't want anything that will be prohibitive for the hand sewing process (some paints/mediums leave the fabric with a plasticy feel which you most definitely do not want)
Aloe-Vera Gel (the clear stuff....no colour)
Assorted paint brushes
Paper hexagon pieces (I am using 1".....these measure 1" on each of the 6 sides)
A fabric glue pen or stick
Below, are the steps that will be done to each hexagon.
Step 1: is to press freezer paper (shiny side down) to the wrong side of the fabric, the freezer paper will stay in place until each hexagon has been painted....it acts as a stabilizer for ease of drawing and painting on fabric
Step 2: Add guidelines......using a Frixion pen ( or any disappearing marker) on the fabric's right side, trace around the outer edge of your hexagon

next add markings indicating roughly 1/4" seam allowance.

Trim close to the seam allowance

you are ready to begin drawing on the hexagon

Step 3: Using a light-box.....trace the desired design using a permanent, waterproof pen ( I use an ultra fine tipped sharpie marker) notice that I have used a little bit of masking tape to secure my hexagon in place to prevent slippage


Step 4: time to add colour.....there are a variety of ways to colour/paint fabric.....for this one I used Seta-Color transparent paint and clear Aloe Vera Gel
I first spread a thin layer of Aloe-Vera gel over the marked design/doodle. The gel makes the application of paint easy without worry of bleeding, running or having to thin the paint first...(use the paint straight from the bottle)
Begin in the center and work outward......I place the hexagon on a small piece of card-stock so I can rotate my work easily without having to handle the hexagon any more than need be

With a paint brush, apply the paint into the still wet aloe vera gel. (the gel has lots of "open" time....meaning that is does not dry quickly)....meaning you don't have to rush
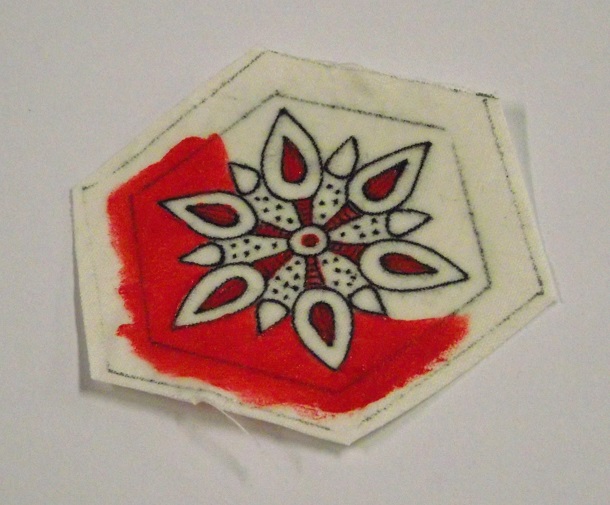
notice that I am brushing the paint over the fold lines. I want to make sure that I have good coverage.

Step 5: Set aside to let dry completely
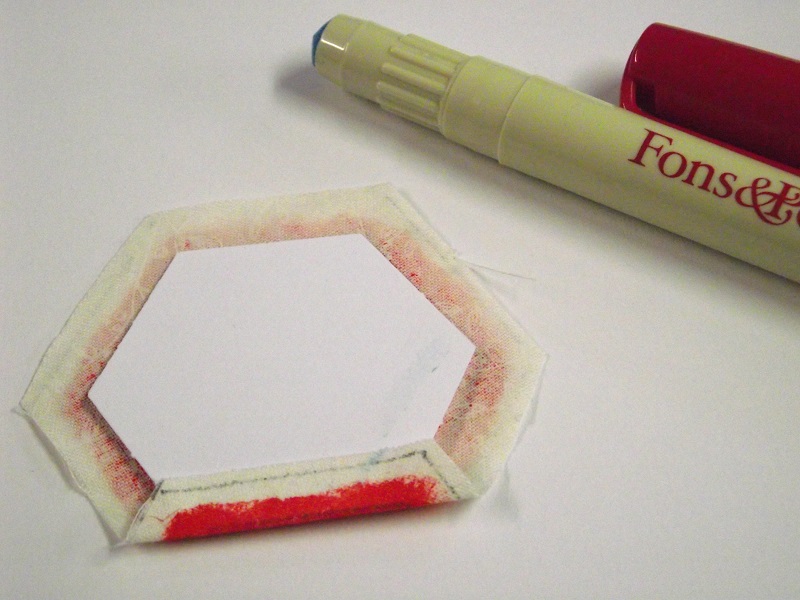
Step 6: Now is the time to remove that freezer paper from the back of your work, place the hexagon face down and place (centering) a precut hexagon paper piece (use the light box if you are having trouble seeing the guidelines)


Step 7: using a glue stick/pen lay a thin line of glue on the paper along the first edge you will turn Tip: keep it back from the very edge of the paper so that there will not be glue in the area you will later being stitching through (For those of you who prefer the thread basting method.....well...you know what to do)
begin folding over each edge, one at a time, until the all edges of the hexagon have been folded to the wrong side


I always test.....so to be certain that the method and supplies I chose to use will all be okay when subjected to water.....I did just that. I heat set this hexie, then simply stitched the hexie onto a piece of wool......which was then submersed it into a dish of water. (here it is underwater...the photo shows that there is no running, bleeding or lifting of colour)


I knew that if I want to able create many of these rosettes (like the one at the top of the post) I was going to be in need of lots of paper hexagons. I have purchased some pre-cut hexagons but holy cow...they run anywhere from $6 for 100 pieces to $7 for 50 pieces (depending on the brand) so I figured that had to be a better way

I found this Fiskar's "Squeeze" punch... it is simple to use, I can cut as many perfect hexagons as I like in just minutes. 1 sheet of card stock yields 20 pieces of the 1" size I am currently using. The cost of this cutter was regularly $30 but I had a 50% off coupon so I think it will pay for itself in no time.

just a note about products......for the single hexagon shown in this tutorial, Seta-colour transparent fabric paint was used....for last weeks rosette (shown at the top of the post), I used Jacquard textile paint, and for the one below, I used Inktense pencils...each "colour" product was used with the Aloe-Vera gel.....in the case of the Inktense pencils....I applied the pencil to the fabric first and then carefully painted the gel over top to "activate" the ink

I am linking up to Nina-Maries Off the Wall Fridays where there is some fabulous inspiration being shared by many outstanding artists.....why not grab your favouite beverage, relax and check them out.
16 comments:
Beautiful work Jill. I just may have to try this. I see another UFO in my future. LOL
Cheryl M.
What a great idea.Thank you for sharing
Merry Christmas from Germany
Doris
OMG....I want to do this SO bad!!!! And I will for sure!!! BUT we're leaving for Florida in 9 days!! All my 'supplies' are packed away. I'll have to look into that punch. I used to cut my own cardboard template and paper hex's...I was so happy to see them precut but the punch is a good idea as well. You know I will try this for sure when I get settled in Florida!!!! Thanks again for sharing SO much with us!!!!
LOVE these and other hexagons works.
I always admire your skills and grateful for your generosity as you so often share your innovative techniques!!!
Wow, I'm so loving these doodled hexies! What a great idea! Thanks for sharing your steps in making them.
These are beautiful and small! Thanks for sharing them.
Wow, you should send this to Quilting Arts magazine!! They would make great Christmas ornaments too. Love it>
Beautiful! Did you get the punch at Michaels? I need to go shopping I so want to try this.
I love these! So clever!
Your art is always amazing and beyond beautiful and you are so generous to explain your techniques. Merry Christmas and 2016 Blessings...
Wow, such a cool idea! Thanks for sharing!
This really looks like great fun and I know I am going to enjoy doing some with you all.
Absolutely fascinating, and you make it look easy! What an interesting and original approach to hexies!
Wow! I love hexagons and I love doodling. Combining the two is a match made in heaven! Can't wait to try this. Thanks. You blocks are beautiful, by the way.
Brilliant! With the Intense one, did you wait for each colour area to dry before you applied the gel over the next colour? Thanks.
Post a Comment