Friday, April 8, 2011

Going Crazy

Next week I will be taking a "Crazy Quilt" workshop.........I have never had a desire to make a crazy quilt but this workshop looks to be lots of fun so I am in. I, of course, will want to do something just a wee bit different so I have decided it will have a "bug" theme. I plan to use a black and white pallet and incorporate some of my doodles.
I have been gathering a few insect fabrics but I wanted some little trims as well, so today, with the help of my printer and a piece of TAP, I printed images, which I then transferred onto twill tape and even a piece of white selvage.
Next I took an image that I printed twice, (the ruler is just for scale)
with some fusible pressed to the wrong side of each and carefully cut out, I was able to create this little double sided moth that can flutter somewhere on the piece.
It will be a nice addition to some of the little metal bits I have collected as well.

Wednesday, March 30, 2011

de-Colourant

On a recent visit to The Marsh Store, I came home with some de-Colourant to try, made by Harbor Sales Inc. Basically, de-Colourant is a substance that you apply to areas of your fabric where you'd like to remove the colour. Once the de-colourant is applied, you leave it to dry, then to "activate" it, you simply press with a good hot iron using lots of steam. There are many of ways to play with this product, try using, brushes, stamps, stencils, resists, the list goes on, but I wanted to see if I could use it with one of my own designs.
I printed directly onto freezer paper and then ironed the freezer paper to fabric.
Next I went to the machine, removed the thread and using the free motion setting, I stitched along the lines. Once I was satisfied that I had created enough perforations, I began to brush the De-colourant over top of the paper.
I peeled off the paper and left it to dry. See how faint this is?And here is what emerged once the steam iron was applied.
One of the things I LOVE about The Marsh Store, is that in addition to the fabulous fabrics, notions, and services they provide, they also strive to bring in products for the art quilter as well, I always come away with something wonderful. Thanks Shirley!

Wednesday, March 23, 2011

Eighth inch stems

In my previous post, I promised to come back and show how I achieve those eighth inch stems. I use a bias tape maker, they come in all sizes. For these tiny stems you will need one that is 6MM or (1/4")
When you are purchasing your bias maker, pay attention to the "mouth" Can you see the difference here?These are both the 1/4" bias tape makers, but the one with the big open mouth won't work for this. The one on the right is what you want to look for........mine is made by Clover and works wonderfully.
Begin by cutting your fabric strips slightly wider than a half inch
Dampen your strip with spray starch or Best Press, then press as you guide the fabric through the bias maker.You now have some nice 1/4 in stems.but wait...........want them even skinnier? Fold them in half and press once again.

Your raw edges are trapped inside and you now have a very narrow bias strip that can be easily curved for the most graceful, narrowest of stems

Friday, March 18, 2011

Applique - Glue Stick and Freezer Paper

This is my preferred applique method. Press your freezer paper shape to the wrong side of the fabric
For ease of applying glue, I do this on an old magazine. The glossy pages make this part of the job super easy and keeps everything much cleaner. You'll want to apply the glue onto both the seam allowance as well as a small amount along the paper's edge.

On this piece, I began with the corners firstThen the sides

Finally the curve
I do NOT remove the freezer paper, it stays in place until all of my pieces are stitched in place and is removed from the back as I showed in my most recent post.

Until recently, I have been using a regular glue stick that you can buy at any office supply store. These work fine, but there are some drawbacks. I find that they are quite "gooey" and can be a little bit of a mess, on top of that, areas where you may have been a little generous with the glue tend to be difficult to pass your needle through. Michele at Quilting Gallery asked if I would like to try a new product called Lapel Stick and offered to send me a couple. I must say that I am impressed with these. They are smooth and easy to apply, rinse out very nicely, stick well, are not nearly as messy and do not leave the fabric quite as stiff, so they do allow for much easier stitching. I did not hesitate to order more so I have a good supply of these on hand.

There has been some discussion in our Yahoo group about how to go about getting nice thin stems. I'll get some photos prepared and show this in my next post

Monday, March 14, 2011

When Fabric Speaks

While working on the next applique block for the "My Tweets" BOM, I was having a little trouble deciding what fabric/colour I wanted to use for the flowers. Nothing in my stash really appealed to me for this one, so of course, I had to go shopping. I came across this fabric on the weekend and it screamed "Take me home.........I am the one"I love the way these pieces turned out.
I hope to have the block assembled later today, so I will be able to show the whole look soon.

Monday, March 7, 2011

Whew!

In my last post I talked about the fact that the method I use for applique involves leaving the freezer paper in until all of the stitching is finished and then immersing the work in warm water to dissolve the glue and soften the paper for removal.
Well, this block is completely stitchedHere is a view of the back............see all the paper still in there?
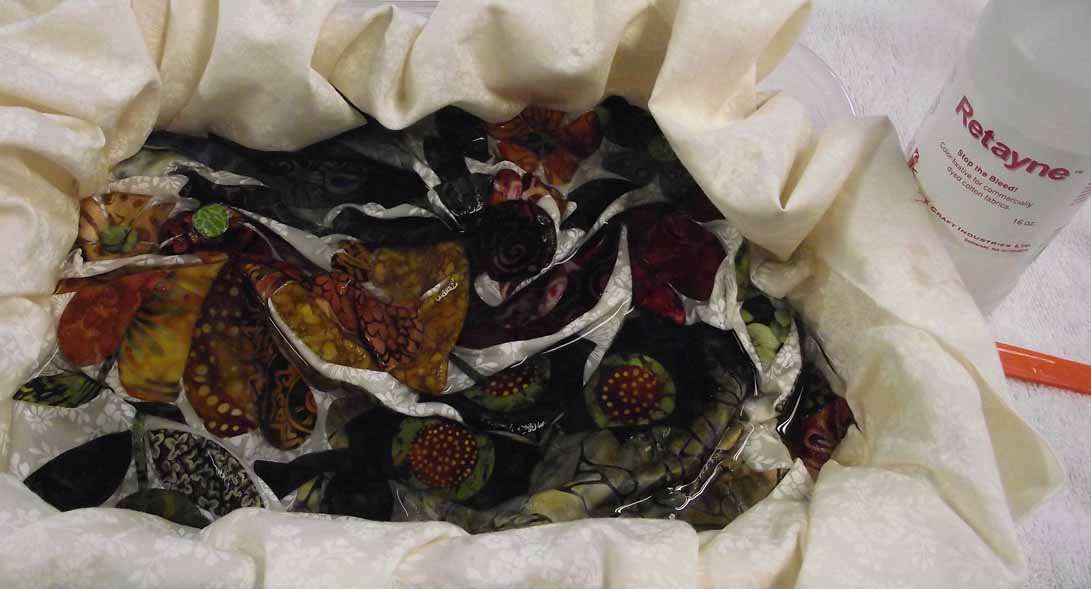
I make slits through just the background fabricPut the block into VERY warm water (I added about a teaspoon of Retayne to the water)
The freezer paper is gently pulled out through the slitsOnce all of the paper is out, the piece is again rinsed to be sure all of the glue is removed, then instead of wringing or squeezing, I roll the piece in a thick towel to get rid of as much water as possible.Next I basically "block" it by making certain I have it laid out as flat and smooth as possible to dry.Here is the block finished, the Retayne once again seems to have helped in the prevention of any nasty mishaps with one or more fabrics that might have other wise bled. (I have to admit that I am really not a pre-washer)....now onto the next block in this "My Tweets" BOM series. I plan to do a little tutorial of sorts on this method......but I have some other products to try......you'll just have to wait and see

Monday, February 28, 2011

Applique and Glue sticks

That is how I learned to applique. Freezer paper and glue sticks. This is the only method I have tried so far and I do like the results. First complaint I hear people have about using freezer paper, is having to reverse the pattern. You don't have to reverse your pattern, you can draw directly on the shiny side of freezer paper if you use a "wash" pencil. (of course you will want to transfer any important markings to the dull side as that is what will be visible when working on your project.
I like that I can pre-assemble all of the larger multi-pieced elements
I can leave most of the pieces aside until I am ready for them..........I just add a few at a time, stitch and then add more
With the pattern lying under the fabric as your guide, line everything up and continue to add pieces. (oh and I glue these down as well) I only use pins where absolutely necessary.
You get very nice smooth edges and wonderfully sharp points. BUT with this method, the freezer paper stays in until all of the stitching is done.
Then you slit the back, hold your breath as you immerse it in VERY warm water. This dissolves the glue while softening the freezer paper which you pull out through the slits you've made. So the big drawback here is if one of more of your fabrics might bleed. I add a few drops of a product called Retayne to the water and so far I have had great results ( or maybe I've just been lucky) We will see what happens when it comes to this block as one of those birds is really quite purple & red.
I still have a bit more stitching to do, tune in next week to see what happens (insert scary music here)

Tuesday, February 22, 2011

Painting Lesson

I have been wanting to teach myself to paint on fabric for some time, its not that I don't have time or supplies, I just never seem to know WHAT to paint, so I never get started. I decided to pick up a couple of instructional books that have lots of lessons/subject matter for student use and just dive in. ( now keep in mind that I can not paint on paper or canvas......so I don't know why I think I can paint on fabric.......I just know I really want to give it a go)
The books that I purchased, are authored by painters using canvas and oils..........I will need to adapt, as I am using fabric, along with a variety of textile paints and inks.
I began by picking a fairly simple shaped subject and using freezer paper created a "resist" so that I could paint my background.
Once the paint had dried and the resist removed, I was able to lightly draw in some of the detail lines.
I slowly began building the base colours


added detailthen added a some dimension with a little bit of thread painting.They say that we learn by our mistakes..............well I learned a great deal as I worked on this small piece, I plan to add borders and quilt it.
Eventually, I would like to be able to work from my own photos.

Wednesday, February 16, 2011

Developing the Centerpiece

While waiting for the next block in the "My Tweets" BOM, I have been working on preparing the centerpiece of the quilt. I thought I would show you how I go about working with an applique design that has a lot of pieces. I begin by tracing all of the elements onto freezer paper to create the templates. I then laid the full size paper pattern on top of a piece of Styrofoam so that I can pin each piece in place as I cut it out. This helps to keep all those little bits (there are 123 of them) in the correct place/order and allows me to very quickly see if I am happy with my fabric choice. In this case, I started with the leaves, and vase, then moved onto the birds as I was fairly certain which fabrics I wanted in those spots.Now with many of the key elements in place, I audition fabrics for the rest, trying to maintain good balance with colour and value. I don't do the next step in the preparing the applique piece just yet. I simply place the raw edged piece in place until I am satisfied that it is a keeper.
Only once I am pleased with my choices, do I move onto the next stage. Here, all of the pieces are now prepared and ready to be placed onto the background fabric for stitching.
This center block is made up of 50 different fabrics. When I shop for fabric I tend to purchase almost exclusively fat quarters, so while my stash is not large, I do have a wide selection to pull from.

Thursday, February 10, 2011

What can you do with those tiny scraps?

Some time ago, I saw a post on Terri Stegmiller's site, Stegart showing how to do a Mosaic Collage with little bits of fabrics. This is something I filed away, wanting to try.....It is on a long list of things I want to get to.
I decided to give it a whirl on a very small scale. I chopped up some bits of fabric (these measure about 3/4" square), the hearts are a simple rubber stamp design on fabric, then coloured with inks, cut out with fusible on the back.
On top of a piece of Timtex, I added a layer of fusible web, on top of that, I laid out those bits of fabric. Using a dry iron and parchment paper to protect it, I fused everything in place.
When it came to the quilting, I found this foot that I purchased for my Janome 6600P very useful. It is easy to see through and allows you to free motion over those raw edges super easily.

I fused the hearts in place, trimmed it up and now I have a postcard ready for my guild's postcard exchange.
For some incredible inspiration and great ideas, be sure to check out 3 Creative Studios Look at the list of Free Projects to find Terri's Mosaic Collage Art Quilting Technique. She shows you step by step, how to do a whole art quilt with this technique (not just a background)

Aren't you just amazed by what other quilters share with us everyday? FANTASTIC!!!!
Copyright Jill Buckley