Monday, March 28, 2016

Dressform Cover

Recently, I decided I wanted to design a few new garments for myself ( it has been a very long time away from that particular discipline)  I really dislike the look of the typical home sewer's dress form.....that red, those gaps and ugly dials are not a pretty sight and I find it distracting when I am trying to visualize the finished look of a garment in process. SO.....figured it was time to cover up the ugly!


I am a "make do" sort of gal, and happened to have some of this rib knit on hand, it turned out to be the perfect fabric choice for the job.  It has terrific stretch, it is nice and thick with extremely good memory to hold the shaping.

I started by simply making a "tube" and placed it on the dress form. I allowed lots extra at the bottom as I knew that I ultimately would be creating a drawstring closure to pull it all together.  I pinned the center back, stretching to get a smooth (but not too tight) fit, I pinned the shaping up at the neck and shoulder area, took it off the form.........stitched and trimmed.


....then placed it back on the mannequin repeating the process for a few refinements until I had a smooth, well fitted cover. 


Now, my garments look much better as I work on them, and the form itself is a much more pleasing sight when not in use.


Tuesday, March 1, 2016

The Art of Fashion Tangling.....now available!!!!!

Yahooooo!  Back in October, I told you about my involvement in this book. You can find that post here. (where you will also find links to the sites of all the authors/artists that are featured in this book.)

The release date was moved up and today is it!!!!!.....as you might imagine.....I am super excited....I hope to get my hands on a copy very soon. The book is available at many fine book retailers as well as many online sources, including Amazon


I have been continuing to play with digital doodling (drawing on my iPad) I guess I was thinking about a "can't do without" tool in fashion creation as inspiration for this one......I still have my giant scissors....although they don't look quite like these.  :-)


Monday, February 22, 2016

Designing....Doodled Hexagons

I have not made much progress lately in the actual painting and stitching of my "doodled" hexagons, but, I have been working to design and sort of plan out this project.
I say..........sort of plan.... because I don't really know where I am going with this, just that I am intrigued with the process and want to see where it might lead.
At this point I am trying to decide exactly what colour palette I will want to play with.....so, for now, I am creating, organizing and preparing designs that I plan to Hex.... in ink, paint and cloth.

I thought you might like to see how I go about this......it is fairly simple really.....I doodle and sketch on small templates I created for myself


I place mirrors to "see" what designs emerge


when something usable appears.....I clean it up and refine it


I also play on my computer to get a good visual of the final design. One of each (different) hexagon piece is carefully redrawn on paper that is cut to actual size...these then become the templates that I will use for the eventual trace onto cotton process


To keep it all organized, each "set" is being kept in a small zip-lock bag, stapled to the sheet containing its corresponding design.


Monday, February 15, 2016

Another iPad Doodle

I am really, REALLY enjoying using this technology for doodling.

It is a fantastic fit for the way I like to draw.....(and change my mind, erase, and draw again) over and over.  I don't plan to take photos along the way with every drawing, but I thought this might be a good addition to my tutorials page. To better create a "visual" of the way I develop each of my doodles for those who come here seeking that info. 
Whether I draw digitally, or use plain old paper and pen, my process is the same. I draw the basic outline of my subject matter, break the drawing into smaller shapes and simply fill them in with pattern.
For this fish, creating smaller areas within the tail and fins, placing arced lines to better define the shape of the body and head gave me lots of opportunity to place many different patterns.
Some patterns make sense (note the "scales") most do not...polka dots, checks and stripes for instance....but they all work wonderfully together to create a fun drawing

here you see the beginning outline paired with the end result


and here is a look at all the steps to get there


and finally.....a quick video so you can "watch" it come to life


Friday, February 5, 2016

Paperless Drawing

Doodling without paper and pen?........I suppose it was bound to happen. A few weeks ago I was given an iPad mini2 and have since been playing with it to see if it could be used to doodle with reasonable results.  WELL....I am loving it.....truth be told I just might be a little obsessed with this.

I downloaded and tested a few apps....but...once I began exploring the app, Concepts by the folks at Tophatch......I could tell pretty quickly that I was going to really like what it had too offer and wasted no time purchasing the full app. It is perfect for my needs (wants)....actually, it does way more than I need or will likely ever use.  I also ordered a particular stylus called Pencil by Paper 53
At this point, I am not doing a review about these products...just telling you what I am using.

I may never doodle on paper again.....These were created completely on my little iPad


and so was this one.

A great thing about drawing directly onto the screen is that I could simply take screen shots every so often allowing me to later 'go back" and watch as the doodle developed.....I used those images to create a short video


Joining in over at Nina Marie's Off the Wall Fridays......lots of inspiration to be found over there


Thursday, January 28, 2016

Teamwork

Last week, I talked about helping a friend learn to create themed, papercut snowflakes, but did not have a photo to show.....aah... but I have one now!

Susan was quite confident that she could handle the "cutting" part of the process, it was the designing she thought could present a problem for her (she expressed a concern that she could not "draw" well enough) but did want to attempt designing and making these. So,.....we talked about her options.
I suggested that since we really don't need a detailed drawing, but rather a "shape" to work with, that maybe something as simple as a stencil would be a good place to start. It just so happened that she had a stencil of an ice skate on hand.....how perfect was that? We used it to begin to build the design. I simply did a quick "modified" sketch of the stencil image while explaining my thought process when developing designs for these papercuts and the importance of using mirrors as a preview tool......but Susan could have easily used the stencil to trace/draw the image.

In the photo, you can see the rough, sketched outline Susan began with, I talked her through the process of folding the paper as precisely as possible, selecting a section on which to trace the image, refolding, how to determine where access holes needed to be punched, staples applied, and how to decide the cutting order.....but other than that quick sketch on the left, this is COMPLETELY her work and I have to say, I sure was impressed with her very first snowflake.  I am so glad she sent me the photos so that I could share them with you.  I can't wait to see what she will create next!


Friday, January 22, 2016

Winter = Snowflakes.....right?

Earlier this week I was showing a friend how I go about designing my themed, paper snowflakes. After some discussion, she came up with a fabulous idea to use ice skates as her theme. Her snowflake turned out incredibly well .....but unfortunately, I did not think to snap a photo.   :-(
In fact, hers was so terrific, she inspired me to do my own snowflake featuring ice skates....it is cold out so I threw in some mittens too.
this is it, all cut and ready to unfold


and the finished flake


If this is your first visit here and want to know more about these papercut snowflakes, see the tutorial tab at the top of this blog and check out my snowflake gallery (the button is on the sidebar)

Its Friday.....so you know what that means....I am linking up with Nina-Maries Off The Wall Fridays

Thursday, January 14, 2016

Video #2 Cutting Snowflakes

I have been blogging for quite some time now, mostly about  quilting, surface design, papercutting and doodling. Do you know what my most popular ......and most viewed post is?
It is this one on cutting snowflakes 

Since I am trying to teach myself how to make and edit video, I decided to record myself making one of my "themed" snowflakes.  Up until last week, our winter has been pretty mild and without much snow, that all changed over the last few days......it has gotten cold and the white stuff has arrived.
Has me dreaming of spring..... which inspired this snowflake


If you are interested, you can watch my latest video to see it develop from start to finish here


I also cut a slightly different version


Linking to Nina-Marie's Off the Wall Friday....where Nina-Marie has offered some excellent advice for all of us who find ourselves not spending enough of our time "creating"

Friday, January 8, 2016

Testing.

This week was spent doing a few "tests" with a variety of inks and paints. I generally always do a quick test with what ever materials I plan to use, wanting to know how they will fare when subjected to water and how they will leave the "hand" of the fabric.
Other artists and I have been discussing some difficulties experienced recently, when working with particular supplies. For example, Tsukineko inks are very fluid, they are difficult to control and want to rapidly flow and bleed out through the fibers. I have a supply of those inks and wanted to see if there was a way to use them with more control.
Also, I have noticed that my recently purchased Sharpie markers are bleeding when I draw on fabric, I am not getting near as crisp a line as I usually do and wanted to see what else I have on hand that might work better.

here is a quick look at a few of the many test samples I did this week


First lets talk about that old stand by Sharpie marker.  I have used an ultra fine tipped sharpie marker for drawing on fabric for a long time but as I said, lately it is not giving me the same results.
A favourite pen I use for drawing (on paper) is a pigment liner made by Staedtler but I have had trouble with it "running" on fabric.....I now know  that it is waterproof once heat set.
Can you see the difference between the 2 pens?


Now, for those Tsukineko inks, I used the ink in a variety of ways to see what would happen, in the photo below, the leaf on the left had clear Aloe Vera gel spread over the drawing but not beyond its borders, I then carefully painted on the ink.....as you can see in the close up detail the ink still flowed where I did not want it.
That did not happen to the one on the right which was painted with the ink only after it had been pre-mixed with the gel.


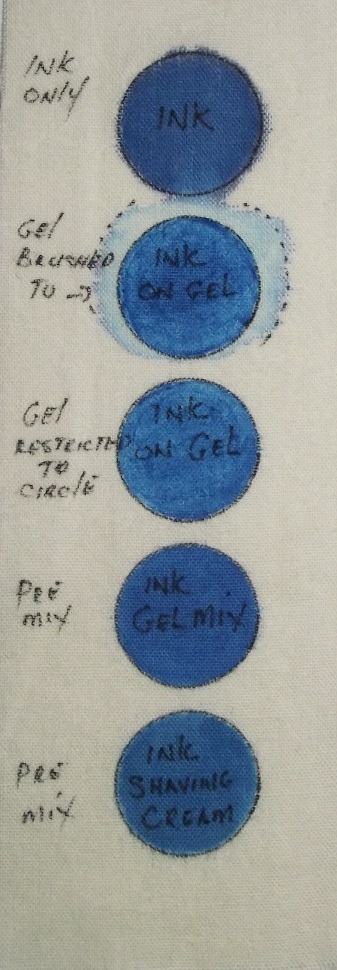
I always like to have reference samples so I made this little piece. I drew several circles and used the ink in a slightly different way each time to see what my results would be.

I have clear aloe gel....the ink....and then created mixtures of gel and ink as well as gel and shaving cream


In the top circle, I painted with the ink straight from the bottle, it quickly began to spread more than I wanted

for the second circle, I brushed the aloe vera gel over and beyond its borders (the dashed line is where I brushed the gel to) even though I only applied the ink to the inside of the circle....as you can see, the ink kept moving

next I applied the gel carefully making sure the gel stayed with in the lines....and so did the ink, but you may notice that the colour is not as vibrant as the one below it

for circle number four, I premixed the ink into the gel, it seems a bit awkward at first to work with it this way but it actually yeilded pretty good results and gave me good "open" time (important if I am doing something where I want to be able to blend colours)

In this last circle.....I tried something I have never done before, at the wonderful suggestion of Gwyned Trefethen, I mixed the ink with some shaving cream....it actually worked quite well! (although it did not give me the same "open" time as the gel.) I will definitely want to explore the use of shaving cream in my studio now....Thanks Gwyned!

Here is a sample showing 2 paints.... I drew the circles....covered the entire surface with the aloe gel and then painted within the circles.....because of the thickness of the paints, they stay exactly where they are put and do not migrate out at all


and so it went, I played with a variety of little tweaks with the paints, inks, gel and shaving cream....then I thought maybe it was time to start organizing some of these little test samples. I happen to have a supply of these page dividers that are made of decent cardstock, using doubled sided tape, I adhered the samples to them that I can now keep together in a binder. I can lift each sample piece and place lots of notes too.
Until now, most of the samples I have done in the past are stuck on a bulletin board, filing cabinet, or hiding in drawers scattered about.....now as I come across them I will finally have a place for them to all live and will be able to easily reference them


below is an example of a test I did many years ago.....it was still lying at the bottom of a drawer, do you know what this is?   any guesses?


 it's Friday.....so I am linking up to Nina-Marie's Off the Wall Friday.....pop on over and see what other creative minds (and hands) have been up to.


Thursday, December 31, 2015

Creating a new Pressing Surface

Way back, deep in the closet, a world map was lurking. It once belonged to my boys, it is old and outdated.....figured it really should head to the trash pile.  But wait!...maybe it could be re-purposed.


Once the narrow metal frame was stripped from it, I was left with a strong, flat, very nice sized, 2' x 3'  piece of Masonite.  I gathered my supplies and set out to create my new pressing surface.


I knew that I wanted to have a double thickness of batting  ( I am using Warm and Natural cotton) I also wanted to be sure that once it was all assembled, the two layers of batt would not shift during the pressing process, so I stitched them together. To do this, I marked a grid (with disappearing ink) and and simply straight stitched along the lines.


Now my 2 batts could act as one layer. I trimmed the inner one ( ultimately the top batt) so that it was just a tiny bit larger than my piece of Masonite and the outer one an inch or so bigger to allow it to wrap around the board.


I wanted to be certain the fabric serving as the outer surface would be smooth and taught so I taped it in place before laying the rest of the layers on top


Now, I was ready to begin pulling it all together. I began by folding and stapling at each corner.


Then stapling at the center of each side and working my way around the whole piece gently tugging to keep everything fairly snug. once all the staples were in place, I gave each one a tap with the hammer.


The next step, was to add something on the back to cover the staples and provide a nice clean "backing". A large piece of felt and double sided tape would do nicely for this. The tape was placed just inside the dimensions of the felt measurement (paper still on the top side) I removed the paper at one short end and firmly stuck the felt down. To make sure I would have no problem getting the felt placed onto the rest of sticky tape (you only get one shot at it ) I used a dowel to roll it all up out of the way.


Removed all of the remaining paper from the tape and then easily rolled the felt back down and into place


so now instead of an outdated, rather useless map in the closet (or on its way to the dump) I now have a nice new pressing surface


of course, I wasn't stopping there. I always like to have a clean surface to work on so I made a pillowcase of sorts ( made it very tight fitting so everything remains taught and flat as possible)


The casing can be flipped, washed, or changed out entirely if I need to


Linking up to Nina-Marie's Off the Wall Fridays

Copyright Jill Buckley