I have been doing a lot of sorting, re-organizing and purging lately because I am in the process of creating a main floor studio. You see, I have always had a work space in the basement and I suppose I am simply tired of being below grade, and especially working under florescent lights....feeling the need for some natural day light. Being in the same house for 40 years also means that there was a LOT to do to be able to make this happen. Not moving occasionally means that one can become complacent, allowing "stuff" to accumulate...way too much stuff. While I am far from being done with this undertaking, I have made enough progress that I now have a room on the main floor dedicated to my creative needs ( because this room is fairly small everything needs to do double duty.) I will keep an area downstairs to store many of my supplies and bring them up depending on what I feel like working on at the time.
So once I had the room empty and a fresh coat of paint applied, I needed to figure out how to make the most of this small space. I am also a big believer in trying to use what I have on hand without tossing perfectly good (but old) furniture. I used my iPad and the app Concepts to figure out exactly how everything would fit before I committed to anything.
The app allows me to input/draw the dimensions of the room, fixtures, cupboards, furnishings and so on letting me see the amount of space it all takes up....allowing me to know how much clearance I have between objects and so on. So ....with a plan in place I was all set to put the room together
I have a lot more work to do to get this room completely functional but I am well on my way. I thought I would share a few photos of how its coming together
I already had that big desk.....built in 1967, it is one SOLID piece of furniture and will do double duty for sure. My husband installed the cupboards and built a simple but very sturdy unit that holds my machines when not in use, those drawer units as well as other supplies.
there is a closet in the room and a spot for my dress form
the desk is 60" x 30" with large drawers and pull outs.....so it will be my cutting, pressing, painting/drawing/sewing surface.
Because I have been spending so much time on this, I have done little in the way of stitching, I am however, still keeping up with The 100 Day Project on Instagram and have used the drawing a day as my creative outlet. You can find me here or click the button on my side bar
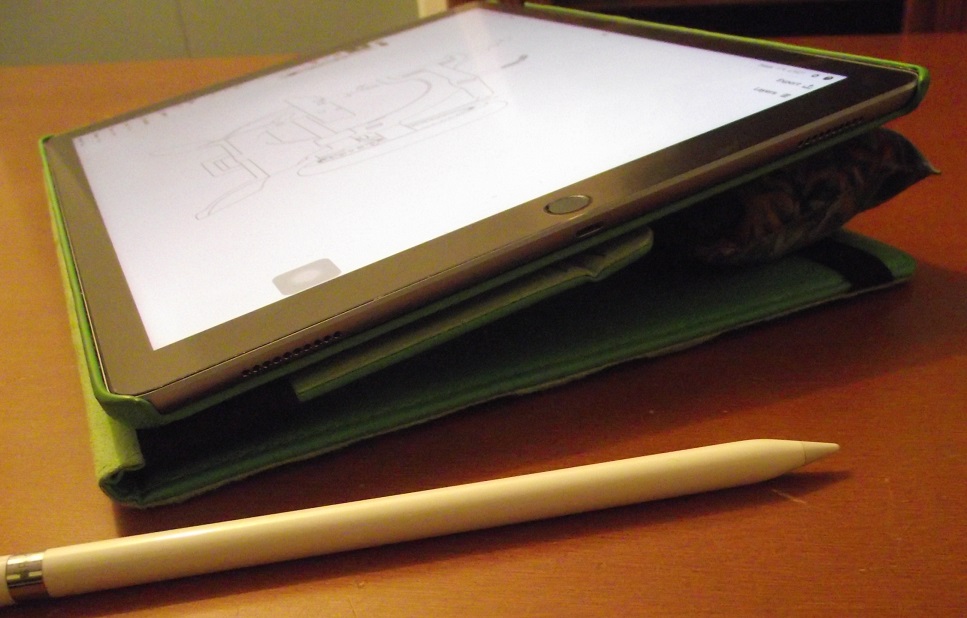
I did create something right here in my new room though!. A "rest" for my iPad. I draw almost exclusively on my iPad these days (generally with it on my lap in front of the TV) but that can lead to a sore neck, I wanted to have my iPad sit at just the right (for me) angle when I am seated at my desk so this is what I did.
I began by making a tube with a piece of muslin cut at 7" x 12.5" which I stitched across the bottom and up one side leaving the top open. I used sand (found it at the dollar store) as the filler because I do want it to have some weight but also be somewhat flexible. I filled the tube to roughly 1.75" from the top then whipped stitched it closed. (this left a bit of space for the sand to shift giving it flexibility) Next, I simply took a bunch of scraps cut into strips and sewed them together.....this was trimmed to 7.75" x 13"
The pieced fabric was also then stitched into a "tube" that the sand filled one could be slipped into
after being stitched closed it was ready for use.
Now I simply place it under my iPad and it elevates the screen to a comfortable height.
back to sorting and deciding what needs to come live in this room. (those cupboards and drawers have not yet been filled)
Saturday, June 16, 2018
Tuesday, April 24, 2018
The 100 Day Project
Have you heard of The 100 Day Project? it is an initiative where you commit to doing something, anything, everyday for 100 days. What that might be is up to you, you choose, I decided to jump in and see if I can actually keep up....... 3 weeks in and so far so good.
What am I doing for my 100 day challenge? I am drawing (digitally on my iPad) every day and posting on Instagram. In most cases I can complete a drawing each day, in others, where the drawing I am working on requires more time than I can dedicate, I am posting progress shots.
as an example, this chickadee.....the entire drawing is made up of dots and took several days to complete
I am playing with some graphic black and white ideas
and trying to work with colour more
When I began, I did not start out with the thought of using my toy sewing machines for inspiration.....but trying to draw every day means not spending a lot of time "thinking" of what I want to draw. I have lots of these little machines, in lots of colours and shapes, so it just kind of happened. :-)
Interested in what else I have been drawing?
You can find me on Instagram Jill Buckley @Quiltrat
What am I doing for my 100 day challenge? I am drawing (digitally on my iPad) every day and posting on Instagram. In most cases I can complete a drawing each day, in others, where the drawing I am working on requires more time than I can dedicate, I am posting progress shots.
as an example, this chickadee.....the entire drawing is made up of dots and took several days to complete
I am playing with some graphic black and white ideas
and trying to work with colour more
When I began, I did not start out with the thought of using my toy sewing machines for inspiration.....but trying to draw every day means not spending a lot of time "thinking" of what I want to draw. I have lots of these little machines, in lots of colours and shapes, so it just kind of happened. :-)
Interested in what else I have been drawing?
You can find me on Instagram Jill Buckley @Quiltrat
Monday, April 2, 2018
Surface Design on Clothing
Surface design on simple garments, like tank tops, is a great way to combine creativity and practicality. (..and...if it does not go according to plan, you have not wasted a lot of fabric) Lately, I have been creating a few new summer tops. This grey jersey has a lovely feel but it is a little boring so why not dress it up with some stencils, paint, thread and maybe even a few beads.
With this top, I started by drawing the pattern outline shape so that I would have some guidelines to work within. I used stencils I designed and cut myself
(I used window film to make the stencils, you can see how I do this in an earlier post here )
I used a stencil brush to apply the textile paint. The fabric is pinned onto a piece of foam core to keep it from slipping about and also provides a good surface for stenciling
Once I had completed stenciling, the paint was heat set with a hot, dry iron to make it permanent. Next I began adding some "outline" stitching.
With the hand stitching done, I then cut out the top and partly assembled it because I wanted to add a few beads and did not want them to be in the way as I machine stitched the shoulder seams, neck and armhole bands. I left the side seams open for easy access allowing me to continue with hand stitched details and beading
I tend to do the hand stitching and beading in the evenings while watching TV ( Netflix) A piece of felt glued into a small margarine lid makes a terrifically portable beading tray.
I have more of that same grey jersey, so this time I am adding dots. Now, because it would be rather difficult to hand cut consistently perfect dots, I used a commercial stencil for this.
This time, I cut the top out prior to stenciling. I stay-stitched the neckline and armholes to keep the bias edges from stretching out of shape while I manipulate the fabric.
In order to make sure the dots would flow nicely across the bottom, I stitched one of the side seams partly closed near the lower edge to ensure that stencil design would be unbroken
I will post the finished top once I get back to the sewing machine.
Rather than putting up a separate post, this one has been updated to include a photo showing how this top with the stenciled dots looked once completed (with a close up of the stitch detail)
With this top, I started by drawing the pattern outline shape so that I would have some guidelines to work within. I used stencils I designed and cut myself
(I used window film to make the stencils, you can see how I do this in an earlier post here )
I used a stencil brush to apply the textile paint. The fabric is pinned onto a piece of foam core to keep it from slipping about and also provides a good surface for stenciling
Once I had completed stenciling, the paint was heat set with a hot, dry iron to make it permanent. Next I began adding some "outline" stitching.
With the hand stitching done, I then cut out the top and partly assembled it because I wanted to add a few beads and did not want them to be in the way as I machine stitched the shoulder seams, neck and armhole bands. I left the side seams open for easy access allowing me to continue with hand stitched details and beading
I tend to do the hand stitching and beading in the evenings while watching TV ( Netflix) A piece of felt glued into a small margarine lid makes a terrifically portable beading tray.
I have more of that same grey jersey, so this time I am adding dots. Now, because it would be rather difficult to hand cut consistently perfect dots, I used a commercial stencil for this.
This time, I cut the top out prior to stenciling. I stay-stitched the neckline and armholes to keep the bias edges from stretching out of shape while I manipulate the fabric.
In order to make sure the dots would flow nicely across the bottom, I stitched one of the side seams partly closed near the lower edge to ensure that stencil design would be unbroken
I will post the finished top once I get back to the sewing machine.
Rather than putting up a separate post, this one has been updated to include a photo showing how this top with the stenciled dots looked once completed (with a close up of the stitch detail)
Monday, March 12, 2018
Feature article.
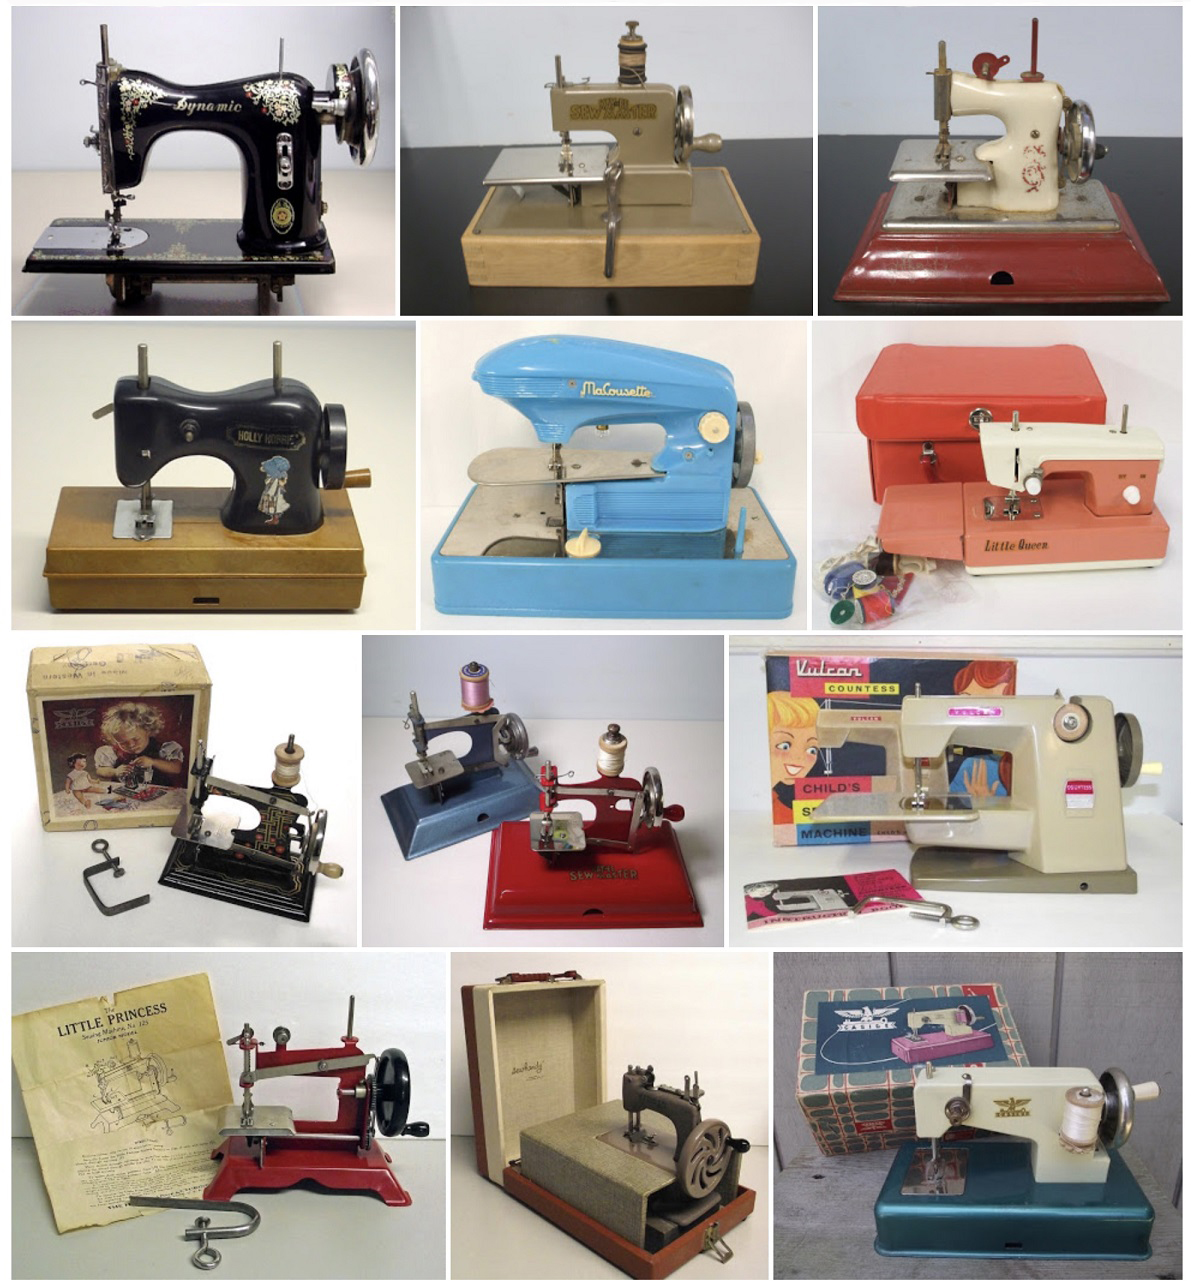
Many of you know that I have a collection of toy and miniature sewing machines. I was recently asked to compose a short article about my collection and well....about these little gems in general. The article appears in the current issue of The Canadian Quilter and I just noticed that it is also a "featured" article which means there is a link to it so that it can be read online. If you would like to take a look, you will find the link here.....look for it under the heading for Canadian Quilter Magazine Spring 2018
If you would like to see individual photos of the machines in my collection (well most of them, I still need to post more photos) You can click the "Toy Sewing Machine" button on my sidebar
But here is an overall look at the photos of my machines that I have posted there.
If you would like to see individual photos of the machines in my collection (well most of them, I still need to post more photos) You can click the "Toy Sewing Machine" button on my sidebar
But here is an overall look at the photos of my machines that I have posted there.
Monday, February 26, 2018
Finished
This quilt was made with the intention of "busting my stash". It is finished, but my stash is only slightly dented. I find it interesting to see how the wonderfully all the fabrics work together as this quilt is made up entirely from a wide variety of fat quarters I had accumulated over the years....the exception being the duvet cover I used as backing and that neutral grey I purchased for the sashing/binding
you can find the earlier posts about this project here.
I made pillow shams to carry out the same look of the quilt. The backs are primarily made up of the last bits of scrap from the duvet.
Like the quilt, I did "big stitch" hand quilting using Aurifil's 12 wt variegated cotton, these lovely threads were also part of my stash.
I cut a gentle curve at the edge of this 106" x 90" quilt, so there is a lot of hand stitched bias binding.
Not sure why this one took so long, (might have something to do with hand stitching through layers of batiks and fusing) but for the most part, I suppose it kind of got forgotten and left on the back burner for a while, but it is finally finished .......hmmmm......but....there is still more stash waiting to be used. :-)
you can find the earlier posts about this project here.
I made pillow shams to carry out the same look of the quilt. The backs are primarily made up of the last bits of scrap from the duvet.
Like the quilt, I did "big stitch" hand quilting using Aurifil's 12 wt variegated cotton, these lovely threads were also part of my stash.
I cut a gentle curve at the edge of this 106" x 90" quilt, so there is a lot of hand stitched bias binding.
Not sure why this one took so long, (might have something to do with hand stitching through layers of batiks and fusing) but for the most part, I suppose it kind of got forgotten and left on the back burner for a while, but it is finally finished .......hmmmm......but....there is still more stash waiting to be used. :-)
Thursday, February 8, 2018
Plain fabric doesn't have to be plain.
A few posts back I showed you a test piece I did where I created surface design by “removing” colour from a knit jersey fabric. Today you will see the same design...but this time, I created it using a DIY stencil, Jacquard textile paint and a sponge.
A friend showed me the work of Natalie Chanin of Alabama Chanin so you know this piece was somewhat inspired by her work but I am not planning to handstitch my garments together. I love hand stitched embellishments, don’t mind taking time to cut stencils and enjoy playing with surface design, but I am not really interested in handstitching all my seams. I recently ordered her book and am looking forward to seeing what her methods are and how I might want to adapt some of them for use in my own garments.
Now, for the most part the Alabama Studio way to apply paint to fabric is with an airbrush....at this point in time, I do not have one and it seems like a lot of trouble to keep clean and so on. For now, I am using a pretty basic technique by dabbing the paint onto the fabric using a small sea sponge.
I lightly marked my fabric to know where the edges of my pattern pieces would lie and stenciled within that area. To keep the fabric stable, I pinned it in place onto a piece of foam core which also gave me a slight "cushion".
Once the paint was dry, it was then heat set with a dry iron.
to add more interest, I began doing a simple running stitch with 12wt variegated cotton thread around the outer edge of each motif.
Next I cut out all of the pieces of my garment.
and assembled the tunic. (I own sewing machines and I know how to use them LOL!)
I created the cord using this vintage korking set
A friend showed me the work of Natalie Chanin of Alabama Chanin so you know this piece was somewhat inspired by her work but I am not planning to handstitch my garments together. I love hand stitched embellishments, don’t mind taking time to cut stencils and enjoy playing with surface design, but I am not really interested in handstitching all my seams. I recently ordered her book and am looking forward to seeing what her methods are and how I might want to adapt some of them for use in my own garments.
Now, for the most part the Alabama Studio way to apply paint to fabric is with an airbrush....at this point in time, I do not have one and it seems like a lot of trouble to keep clean and so on. For now, I am using a pretty basic technique by dabbing the paint onto the fabric using a small sea sponge.
I lightly marked my fabric to know where the edges of my pattern pieces would lie and stenciled within that area. To keep the fabric stable, I pinned it in place onto a piece of foam core which also gave me a slight "cushion".
Once the paint was dry, it was then heat set with a dry iron.
to add more interest, I began doing a simple running stitch with 12wt variegated cotton thread around the outer edge of each motif.
Next I cut out all of the pieces of my garment.
and assembled the tunic. (I own sewing machines and I know how to use them LOL!)
I created the cord using this vintage korking set
Subscribe to:
Posts (Atom)
Copyright Jill Buckley