I still have a bit more stitching to do, tune in next week to see what happens (insert scary music here)
Monday, February 28, 2011
Applique and Glue sticks
That is how I learned to applique. Freezer paper and glue sticks. This is the only method I have tried so far and I do like the results. First complaint I hear people have about using freezer paper, is having to reverse the pattern. You don't have to reverse your pattern, you can draw directly on the shiny side of freezer paper if you use a "wash" pencil. (of course you will want to transfer any important markings to the dull side as that is what will be visible when working on your project.
I like that I can pre-assemble all of the larger multi-pieced elements
I can leave most of the pieces aside until I am ready for them..........I just add a few at a time, stitch and then add more
With the pattern lying under the fabric as your guide, line everything up and continue to add pieces. (oh and I glue these down as well) I only use pins where absolutely necessary.
You get very nice smooth edges and wonderfully sharp points. BUT with this method, the freezer paper stays in until all of the stitching is done.
Then you slit the back, hold your breath as you immerse it in VERY warm water. This dissolves the glue while softening the freezer paper which you pull out through the slits you've made. So the big drawback here is if one of more of your fabrics might bleed. I add a few drops of a product called Retayne to the water and so far I have had great results ( or maybe I've just been lucky) We will see what happens when it comes to this block as one of those birds is really quite purple & red.
I still have a bit more stitching to do, tune in next week to see what happens (insert scary music here)
Tuesday, February 22, 2011
Painting Lesson
I have been wanting to teach myself to paint on fabric for some time, its not that I don't have time or supplies, I just never seem to know WHAT to paint, so I never get started. I decided to pick up a couple of instructional books that have lots of lessons/subject matter for student use and just dive in. ( now keep in mind that I can not paint on paper or canvas......so I don't know why I think I can paint on fabric.......I just know I really want to give it a go)
The books that I purchased, are authored by painters using canvas and oils..........I will need to adapt, as I am using fabric, along with a variety of textile paints and inks.
I began by picking a fairly simple shaped subject and using freezer paper created a "resist" so that I could paint my background.
Once the paint had dried and the resist removed, I was able to lightly draw in some of the detail lines.
I slowly began building the base colours

added detail
then added a some dimension with a little bit of thread painting.
They say that we learn by our mistakes..............well I learned a great deal as I worked on this small piece, I plan to add borders and quilt it.
Eventually, I would like to be able to work from my own photos.
The books that I purchased, are authored by painters using canvas and oils..........I will need to adapt, as I am using fabric, along with a variety of textile paints and inks.
I began by picking a fairly simple shaped subject and using freezer paper created a "resist" so that I could paint my background.

Once the paint had dried and the resist removed, I was able to lightly draw in some of the detail lines.
added detail
then added a some dimension with a little bit of thread painting.
They say that we learn by our mistakes..............well I learned a great deal as I worked on this small piece, I plan to add borders and quilt it.Eventually, I would like to be able to work from my own photos.
Wednesday, February 16, 2011
Developing the Centerpiece
While waiting for the next block in the "My Tweets" BOM, I have been working on preparing the centerpiece of the quilt. I thought I would show you how I go about working with an applique design that has a lot of pieces. I begin by tracing all of the elements onto freezer paper to create the templates. I then laid the full size paper pattern on top of a piece of Styrofoam so that I can pin each piece in place as I cut it out. This helps to keep all those little bits (there are 123 of them) in the correct place/order and allows me to very quickly see if I am happy with my fabric choice. In this case, I started with the leaves, and vase, then moved onto the birds as I was fairly certain which fabrics I wanted in those spots.
Now with many of the key elements in place, I audition fabrics for the rest, trying to maintain good balance with colour and value. I don't do the next step in the preparing the applique piece just yet. I simply place the raw edged piece in place until I am satisfied that it is a keeper.
Only once I am pleased with my choices, do I move onto the next stage. Here, all of the pieces are now prepared and ready to be placed onto the background fabric for stitching.
This center block is made up of 50 different fabrics. When I shop for fabric I tend to purchase almost exclusively fat quarters, so while my stash is not large, I do have a wide selection to pull from.
Now with many of the key elements in place, I audition fabrics for the rest, trying to maintain good balance with colour and value. I don't do the next step in the preparing the applique piece just yet. I simply place the raw edged piece in place until I am satisfied that it is a keeper.
Only once I am pleased with my choices, do I move onto the next stage. Here, all of the pieces are now prepared and ready to be placed onto the background fabric for stitching.
This center block is made up of 50 different fabrics. When I shop for fabric I tend to purchase almost exclusively fat quarters, so while my stash is not large, I do have a wide selection to pull from.
Thursday, February 10, 2011
What can you do with those tiny scraps?
Some time ago, I saw a post on Terri Stegmiller's site, Stegart showing how to do a Mosaic Collage with little bits of fabrics. This is something I filed away, wanting to try.....It is on a long list of things I want to get to.
I decided to give it a whirl on a very small scale. I chopped up some bits of fabric (these measure about 3/4" square), the hearts are a simple rubber stamp design on fabric, then coloured with inks, cut out with fusible on the back.
On top of a piece of Timtex, I added a layer of fusible web, on top of that, I laid out those bits of fabric. Using a dry iron and parchment paper to protect it, I fused everything in place.
When it came to the quilting, I found this foot that I purchased for my Janome 6600P very useful. It is easy to see through and allows you to free motion over those raw edges super easily.

I fused the hearts in place, trimmed it up and now I have a postcard ready for my guild's postcard exchange.
For some incredible inspiration and great ideas, be sure to check out 3 Creative Studios Look at the list of Free Projects to find Terri's Mosaic Collage Art Quilting Technique. She shows you step by step, how to do a whole art quilt with this technique (not just a background)
Aren't you just amazed by what other quilters share with us everyday? FANTASTIC!!!!
I decided to give it a whirl on a very small scale. I chopped up some bits of fabric (these measure about 3/4" square), the hearts are a simple rubber stamp design on fabric, then coloured with inks, cut out with fusible on the back.
Aren't you just amazed by what other quilters share with us everyday? FANTASTIC!!!!
Friday, February 4, 2011
Feathered Heart and Giveaway Winner
Thanks to everyone who entered, I wish I could send everyone a book but I could only choose 1 name........the winner is number 39 .....Joanne, Congratulations! I'll be in touch to get your snail mail info
btw (I counted the first 2 comments as one, since they were from the same blogger)
Now, I don't want the rest of you to go away empty handed so how about if I share this project with you. I wanted some extra clipart for my guild's newsletter, something valentine(y) so I drew this feathered heart and scanned it.
Then I thought how would this look stitched, so after tracing I did a little FMQ
of course, I could not leave it alone, so after stitching, I decided to add some colour.
In this case I used INKTENSE pencils.
Instead of wetting them with water I used a bit of clear aloe-vera gel with a small paint brush. See the how the gel makes the colour come alive? The photo below shows the right side having had a thin layer of gel applied on top of the pencil. By using the gel you have no danger of the colour bleeding.
I did mine on a small piece of fabric to turn into a postcard but you could do this any size you like.
So snag that black and white feathered heart imagine for yourself and play with it......stitch, colour ( use pencils, inks, crayons, paints, whatever you have) or even maybe try Zentangle patterns on it. Enjoy!
Now, I don't want the rest of you to go away empty handed so how about if I share this project with you. I wanted some extra clipart for my guild's newsletter, something valentine(y) so I drew this feathered heart and scanned it.
Then I thought how would this look stitched, so after tracing I did a little FMQIn this case I used INKTENSE pencils.
Labels:
Aloe Vera Gel,
Giveaway,
Inktense pencils,
postcards
Friday, January 28, 2011
#200
yup, I have actually reached post number 200!
Today's post is about working with black fabric, the first thing you need to know, is that you will always want to purchase more fabric than you think you will need for a project (black fabrics are really difficult to match if you find you have not bought enough) I realized too late, that I don't have the yardage required for what I had originally planned, so this piece will have to go in a different direction. In an earlier post, I showed one of these hand appliqued feather blocks, here are four of them now joined to create the center medallion.
Those colours? some are commercial dyes and many are my hand painted fabrics. Another thing I discovered about using black fabric is that with such high contrast, every flaw is magnified. YIKES!
Now I suppose post number 200 needs to be celebrated, so I think I must have a giveaway. Leave a comment to enter, its just that simple. Please be sure I have a way to contact you
The prize?
how about a copy of Zentangle Fabric Arts
(you can read the post about my involvement in this book here)
For any of you who may already own this book, let me know in the comment and if your name is drawn I'll send you something else. I'll make the draw next Friday.
Today's post is about working with black fabric, the first thing you need to know, is that you will always want to purchase more fabric than you think you will need for a project (black fabrics are really difficult to match if you find you have not bought enough) I realized too late, that I don't have the yardage required for what I had originally planned, so this piece will have to go in a different direction. In an earlier post, I showed one of these hand appliqued feather blocks, here are four of them now joined to create the center medallion.
Those colours? some are commercial dyes and many are my hand painted fabrics. Another thing I discovered about using black fabric is that with such high contrast, every flaw is magnified. YIKES!Now I suppose post number 200 needs to be celebrated, so I think I must have a giveaway. Leave a comment to enter, its just that simple. Please be sure I have a way to contact you
The prize?
how about a copy of Zentangle Fabric Arts
(you can read the post about my involvement in this book here)For any of you who may already own this book, let me know in the comment and if your name is drawn I'll send you something else. I'll make the draw next Friday.
Labels:
Applique,
fabric painting,
Feathers,
Giveaway,
post #200,
Zentangle Fabric Arts
Sunday, January 23, 2011
"My Tweets" Block 1
Those of you who know me, know that I rarely use patterns created by others, but this year I have decided to take on my very first BOM. Erin Russek over at One Piece at a Time is hosting a block of the month called "My Tweets" .......an applique quilt featuring lots of birds, flowers and vines.
Now, of course, you know I am not going to do exactly what everyone else is doing. While I really enjoy hand applique I also want to draw, paint, ink, bead............and well you get the idea. I began block one with some paints, inks and brushes
Once I had the image completely painted I added applique here and there.
I want to wait until I have several blocks to this stage before deciding how "finished" this is. I am looking forward to seeing how this will evolve over the next 12 months.
Now, of course, you know I am not going to do exactly what everyone else is doing. While I really enjoy hand applique I also want to draw, paint, ink, bead............and well you get the idea. I began block one with some paints, inks and brushes
Once I had the image completely painted I added applique here and there.
I want to wait until I have several blocks to this stage before deciding how "finished" this is. I am looking forward to seeing how this will evolve over the next 12 months.
Thursday, January 20, 2011
Washing Yardage
Let me begin my stating that this was NOT my idea......I read, or heard of this method for pre-washing yardage some time ago. I wish I could remember where because I would love to give them credit. This little time saving trick worked so well for me I had to pass it along.
I had a piece of fabric just over 9 metres long, needing to be pre-washed. You know what happens when you throw that full length of fabric into the washer......you end up with a big twisted mess that has to be unwound to then go into the dryer where it just twists up again so that by the time it is dry you have to spend a long time at the ironing board trying to get rid of all the wrinkling.
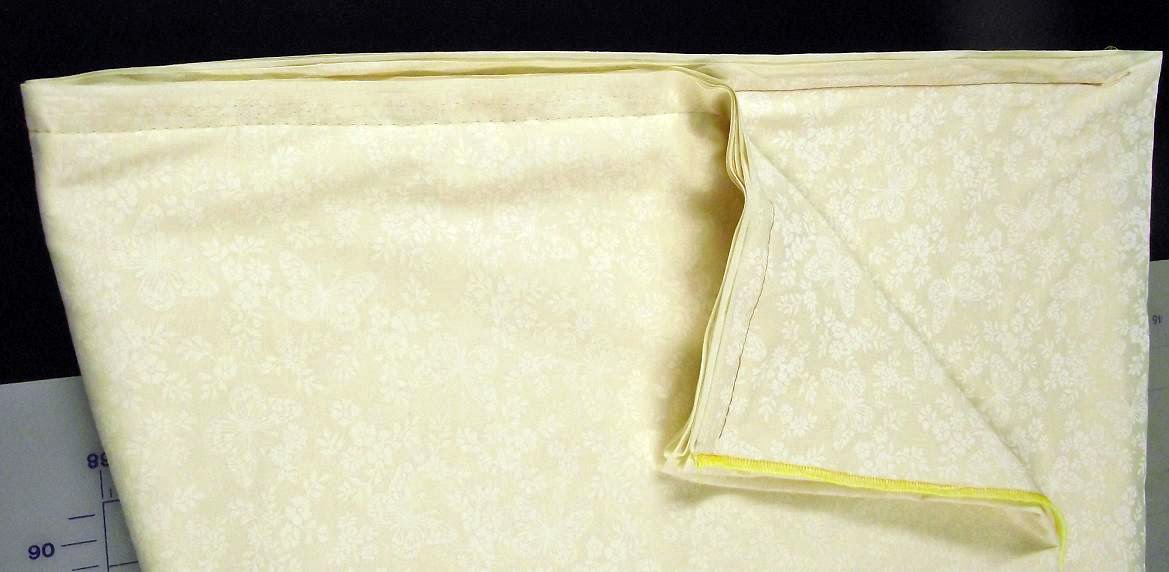
To avoid this, a little prep work is all you need. Here is what I did.
I opened the fabric up so that it was the full 45" long, serged the raw edges to prevent unraveling, and then began accordion folding in roughly 1m lengths along one selvage edge. I set my machine to a long stitch, used a contrasting thread in the bobbin and proceeded to stitch the selvage edges closed through all layers. ( Not sure if it was only supposed to be done at one end but I did this to both ends)
What went into the washer was a piece of fabric that measured about 45 x 40 inches and 9 layers thick. I checked it a couple of times during the wash cycle to make certain it stayed in that shape. When it came out of the dryer I unpicked the basting threads and left the piece draped over the ironing board still folded, to finish drying (the selvage area was still damp)
The only pressing I will need to do is what I would generally when beginning any project. You can bet I'll be using this method to pre-wash my fabrics in the future
I had a piece of fabric just over 9 metres long, needing to be pre-washed. You know what happens when you throw that full length of fabric into the washer......you end up with a big twisted mess that has to be unwound to then go into the dryer where it just twists up again so that by the time it is dry you have to spend a long time at the ironing board trying to get rid of all the wrinkling.
To avoid this, a little prep work is all you need. Here is what I did.
I opened the fabric up so that it was the full 45" long, serged the raw edges to prevent unraveling, and then began accordion folding in roughly 1m lengths along one selvage edge. I set my machine to a long stitch, used a contrasting thread in the bobbin and proceeded to stitch the selvage edges closed through all layers. ( Not sure if it was only supposed to be done at one end but I did this to both ends)
What went into the washer was a piece of fabric that measured about 45 x 40 inches and 9 layers thick. I checked it a couple of times during the wash cycle to make certain it stayed in that shape. When it came out of the dryer I unpicked the basting threads and left the piece draped over the ironing board still folded, to finish drying (the selvage area was still damp)The only pressing I will need to do is what I would generally when beginning any project. You can bet I'll be using this method to pre-wash my fabrics in the future
Friday, January 14, 2011
Marking Solution
How do you transfer a design onto dark fabric when even a light box doesn't work? Here's what I did. Wanting to transfer my markings for applique placement, I created a stencil.
This allows me to easily see exactly where I am placing my design and mark it. In this case, I kept it a little "inside" my finished design so that I could place my applique pieces knowing that I would not have to worry about any of the lines showing on the finished block

You might think this would be a bit of a pain if you only plan to use the design once, but it is a great solution for doing multiples of applique, quilting designs, trapunto......well you get the idea.

Sunday, January 9, 2011
Getting Back on Track
I had fallen a little behind in doing the weekly responses for The Creative Prompt Project.
I thought that while I will continue to pick away at the list of ones I've missed, I would at least try to stay up to date with the words for 2011. Jaye posted the first one of the new year on Friday........here is my response. Can you guess what the word is?
The answer is here
I thought that while I will continue to pick away at the list of ones I've missed, I would at least try to stay up to date with the words for 2011. Jaye posted the first one of the new year on Friday........here is my response. Can you guess what the word is?
The answer is here
Subscribe to:
Posts (Atom)
Copyright Jill Buckley